A credit note from a vendor reduces what you owe the vendor for a bill you already recorded. Vendors issue credit notes when goods are returned, goods arrive damaged or wrong, or the bill had a pricing error or overcharge. A vendor credit note is also called a supplier credit note, vendor credit, purchase credit note or (from the buyer's side) a debit note.
In LocalizeBook there is no separate Credit Note form. You record a vendor credit note with a Purchase Return (PRT). A purchase return can return goods to stock, record a price adjustment without goods, or both, and you can apply it to the vendor's open bill.
Note: This article is about credit notes you receive from vendors. To give a credit note to a customer, use a Sale Return (SRT) (see the Sale Return article).
When to record a vendor credit note
- You returned goods to the vendor.
- Goods arrived damaged, wrong or in excess, and the vendor credits you.
- The vendor's bill had a pricing error or overcharge.
- The vendor gives you a discount or rebate after the bill was recorded.
Goods returned or price adjustment?
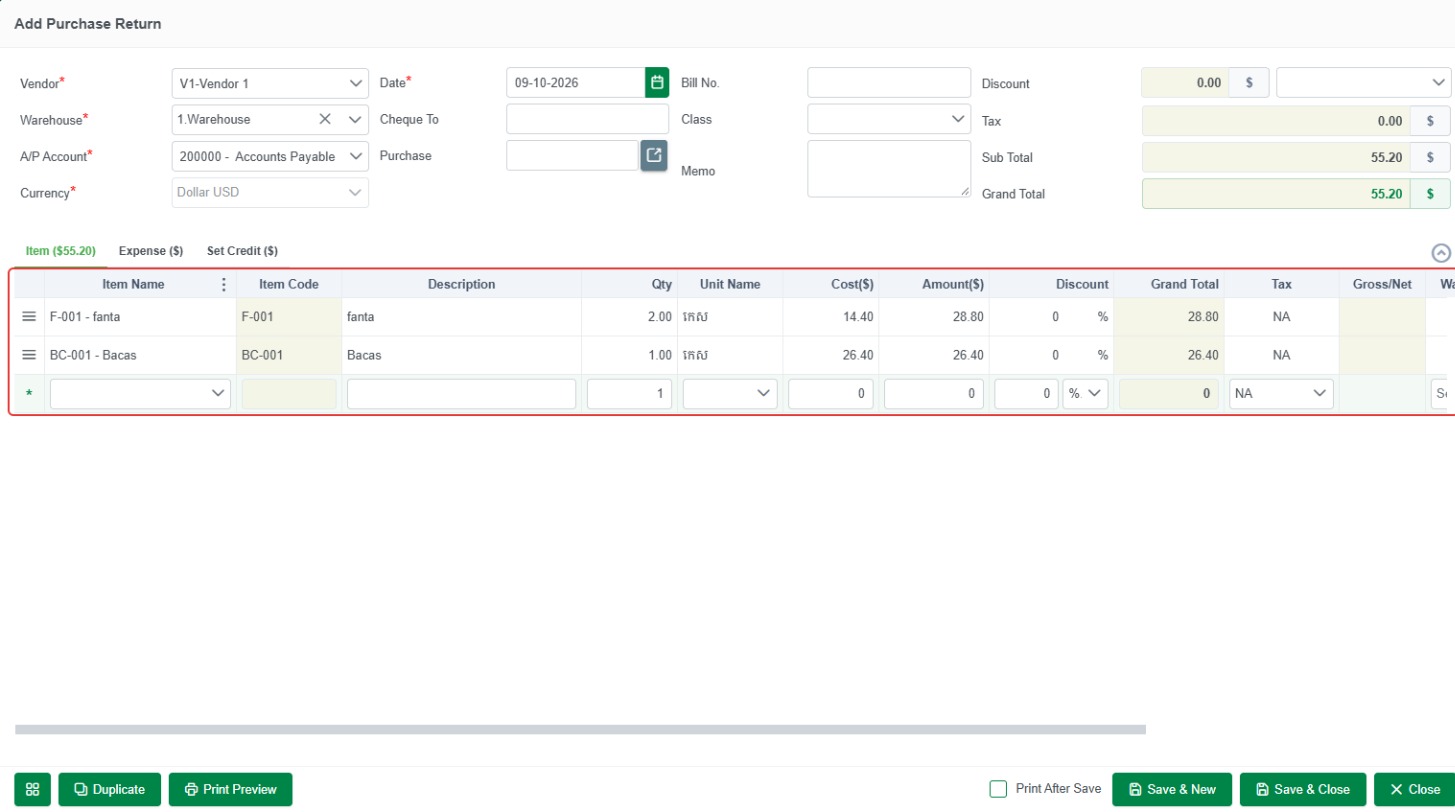
- Goods returned – enter the items on the Item ($) tab of the purchase return. The returned quantities leave your stock, and the amount you owe goes down.
- Price adjustment without returning goods (overcharge, pricing error, discount or rebate) – enter the amount on the Expense ($) tab. Your stock quantities don't change; only the amount you owe goes down.
How to record a vendor credit note
Step 1: Open the Add Purchase Return form
- Go to Vendor > Vendor Center and select the vendor.
- On the Transaction tab, click Add, then click Purchase Return (PRT).
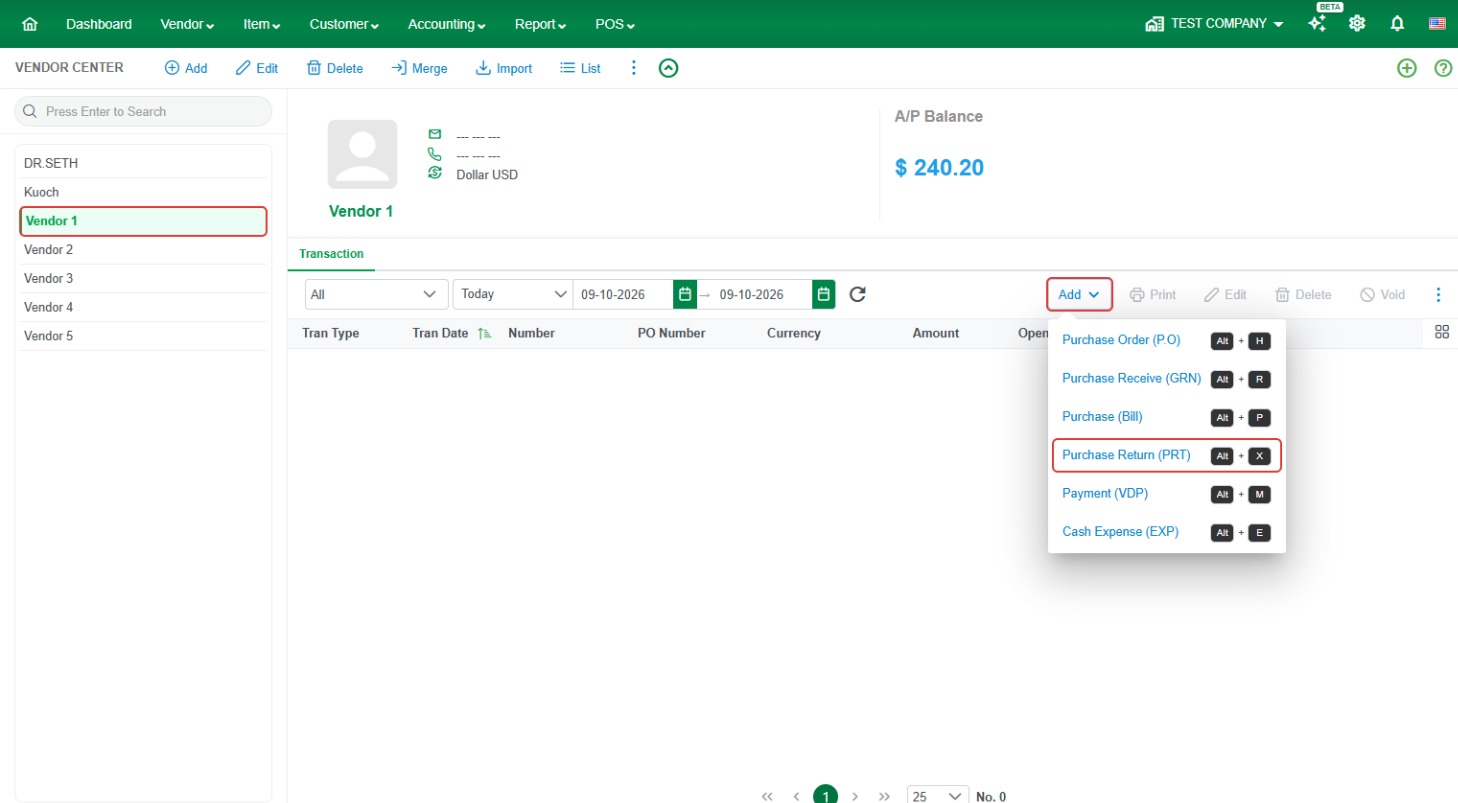
Other ways to open the same form:
- Go to Vendor > Vendor Transaction, click Add and choose Purchase Return (PRT).
- Click New Transaction on the home page and choose Purchase Return.
- Press Alt + X (keyboard shortcut).
Step 2: Fill in the header
- Vendor* – the vendor who issued the credit note.
- Warehouse*, A/P Account* (for example 200000 - Accounts Payable) and Currency* – check the defaults.
- Date* – the date of the credit note.
- Bill No. – the vendor's credit note number, so you can match it to the vendor's document.
- Purchase – click the button next to it to pull in the original bill (see Step 3).
- Memo – the reason for the credit, for example "Credit for 2 damaged bags" or "Overcharge on INV-1003".
Step 3: Enter what the credit is for
A. Goods returned (Item tab)
- Click the button next to Purchase. The Purchase Pending window lists the vendor's purchases. Filter by Currency, Warehouse or Date (it starts at Month to Date), or search by Bill No.
- Choose the bill. The Detail panel shows each item's Cost, Qty, Returned Qty and Pending Qty (the quantity that can still be returned). Click Select.
- On the Item ($) tab, change Qty to the quantity on the credit note and remove lines that are not credited. Check the Cost, Tax and Warehouse.
B. Price adjustment without goods (Expense tab)
- Open the Expense ($) tab.
- Enter a Memo (what the credit is for), the Amount of the credit, the Account and the Tax (NA for no tax). For the Account, use the account the original cost was recorded to, or a purchase discount account such as 519999 - Purchase Discount. Ask your accountant if you are not sure.
- Click the save icon at the end of the line.
One credit note can have lines on both tabs if the vendor credits returned goods and a price adjustment together.
Step 4: Apply the credit to the vendor's bill (Set Credit)
- Open the Set Credit ($) tab. It lists the vendor's open bills with Tran Type, Tran Date, Number, Grand Total, Open Balance, Discount Account, Discount Amount, Pay Amount and Memo.
- Tick the bill the credit note is for. The Pay Amount fills in automatically.
- Check the totals: Grand Total Before Credit is the total of the credit note, Credit is the amount applied to the ticked bills, and Total Payment is what is left over as a credit.
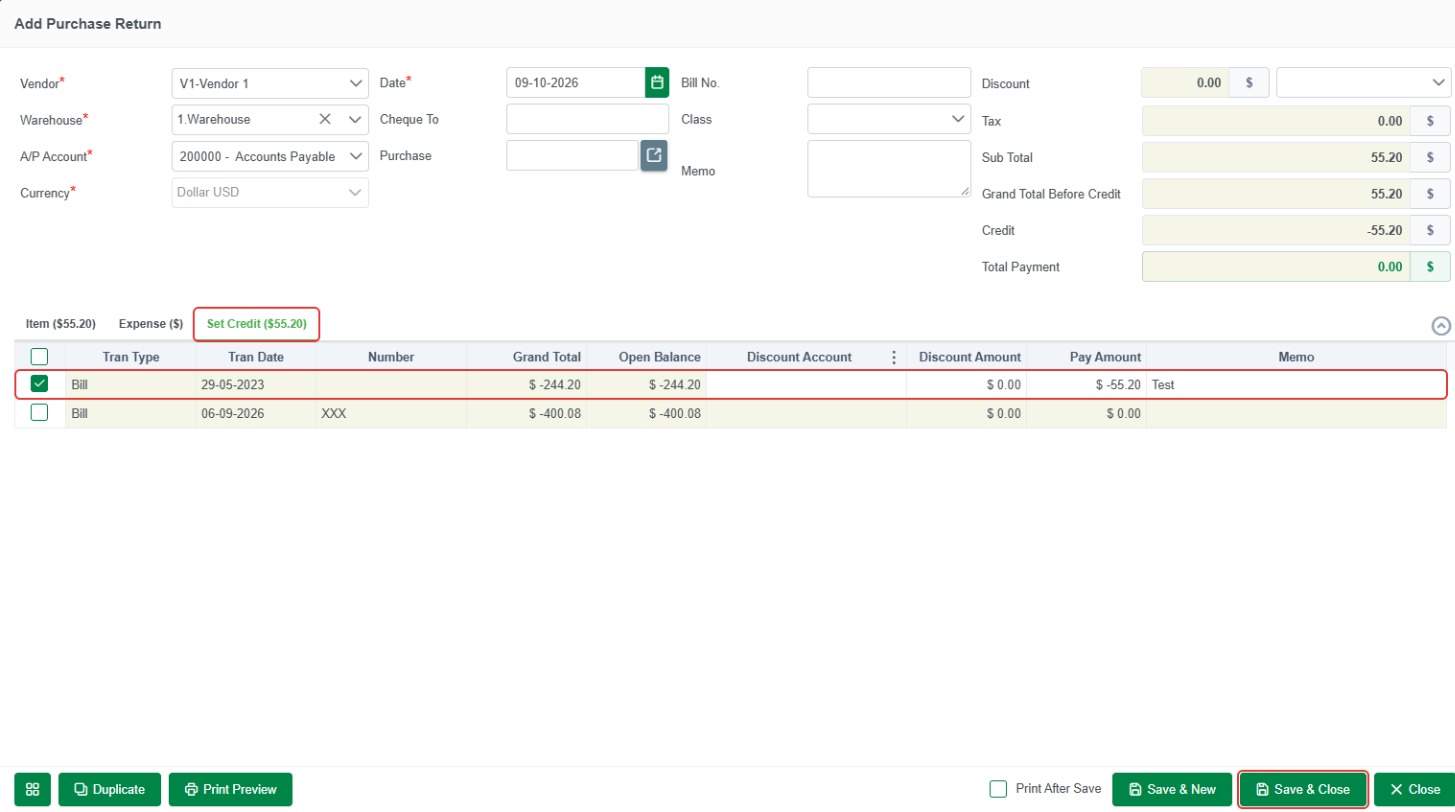
- Click Save & New or Save & Close.
The bill's Open Balance goes down by the amount applied. If you don't tick a bill, the whole credit note stays as an open credit for the vendor.
Step 5: Check the result
In Vendor > Vendor Center, select the vendor and open the Transaction tab (set the date to All Date). The credit note shows with Tran Type PRT. A credit that is not used yet shows a negative Open Balance.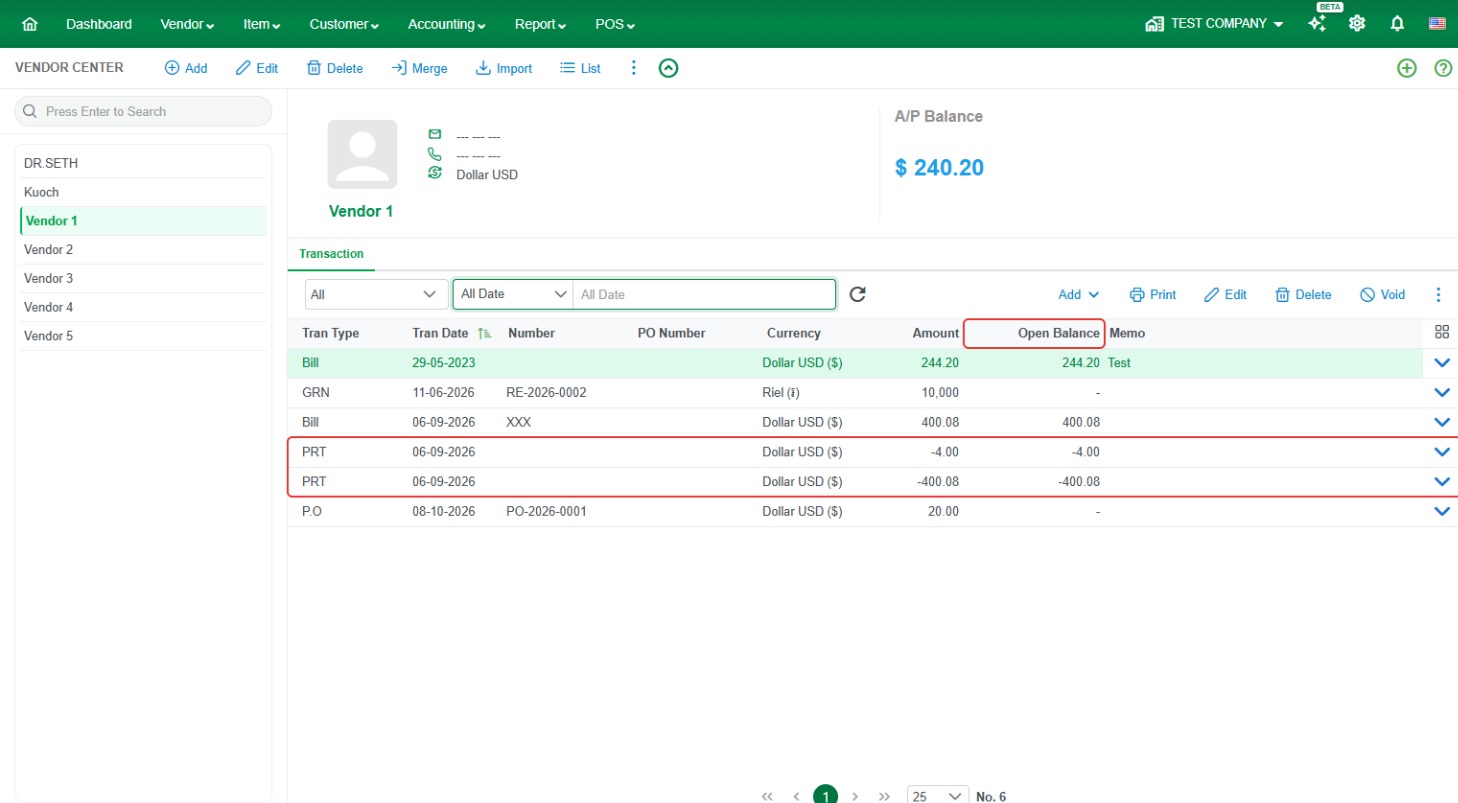
How to use an open vendor credit on a later bill
- Open the vendor's new Purchase (Bill), or create one (Alt + P).
- Open the Set Credit ($) tab.
- Tick the purchase return (credit note) and enter the Pay Amount to use.
- Save the bill. Its Open Balance goes down by the credit used, and you pay only the rest.
How to find, edit, void or delete a vendor credit note
- Find – go to Vendor > Vendor Transaction, set the date filter to All Date (it starts at Today) and, in the transaction type filter, tick only Purchase Return. You can also see it in Vendor Center on the vendor's Transaction tab.
- Edit, Void or Delete – in Vendor > Vendor Center, select the vendor, open the Transaction tab, click the purchase return, then click Edit, Void or Delete above the list. Void keeps it in the list, shown in red; Delete removes it completely.
Frequently asked questions about credit notes
How do I record a credit note from a supplier in LocalizeBook?
Create a Purchase Return (PRT) for the vendor. Enter returned goods on the Item tab or a price adjustment on the Expense tab, put the vendor's credit note number in Bill No., tick the bill on the Set Credit tab and save.
Is there a separate Credit Note form?
No. Vendor credit notes are recorded as Purchase Returns (PRT). Customer credit notes are recorded as Sale Returns (SRT).
How do I record a credit note when no goods are returned?
Use the Expense ($) tab of the purchase return: enter the Memo, Amount, Account and Tax. Stock quantities don't change.
Does a vendor credit note reduce my stock?
Only for item lines on the Item ($) tab. Lines on the Expense ($) tab don't change stock quantities.
How do I apply a vendor credit note to a bill?
On the purchase return's Set Credit ($) tab, tick the bill. Or later, on the bill's Set Credit ($) tab, tick the purchase return and enter the Pay Amount.
Where do I enter the vendor's credit note number?
In the Bill No. field of the purchase return.
What is the difference between a credit note and a debit note?
A credit note is issued by the vendor to reduce what you owe. A debit note is sometimes issued by the buyer to the vendor when returning goods. In LocalizeBook, both are recorded as a Purchase Return on the vendor side.
How do I give a credit note to a customer?
Create a Sale Return (SRT). Its printed document is the customer credit note. See the Sale Return article.
Why don't I see the credit on the bill's Set Credit tab?
Check that the bill and the purchase return are for the same vendor and currency, and that the credit has not already been fully used.
What is the keyboard shortcut for a purchase return?
Press Alt + X to open a new purchase return.