A Purchase (Bill) in LocalizeBook records the vendor's bill (invoice) for goods or services you bought. It records the purchase and the amount you owe the vendor (Accounts Payable). Enter a purchase when you receive the vendor's invoice. A purchase bill is also called a vendor bill, supplier invoice, purchase invoice or bill.
Where the purchase bill fits in the purchase process
The purchase process in LocalizeBook is Vendor → Purchase Order (PO) → Goods Received (GRN) → Purchase (Bill) → Payment (VDP). The purchase order and goods received steps are optional, so you can enter a purchase bill directly.
- A purchase bill increases what you owe the vendor (Accounts Payable). Its unpaid amount shows as the Open Balance in Vendor Transaction.
- Items on a bill that was not received with a Goods Received are added to stock. In the accounts, the bill debits Inventory Asset (for example 131000-Inventory Asset) and credits Accounts Payable (200000-Accounts Payable).
- A bill made from a Goods Received does not add the stock again. It debits Goods Received Not Purchase (299000) and credits Accounts Payable.
- You pay the bill later with a Payment (VDP).
Ways to add purchase bills
- Create Purchase (Bill) – enter one bill in the Add Purchase form (this article).
- Batch Purchase & Purchase Return – enter several bills or returns at once (see the Batch Purchase & Purchase Return article).
- Import – in Vendor > Vendor Transaction, click Import to bring in transactions from a file.
How to create a purchase bill
Step 1: Open the Add Purchase form
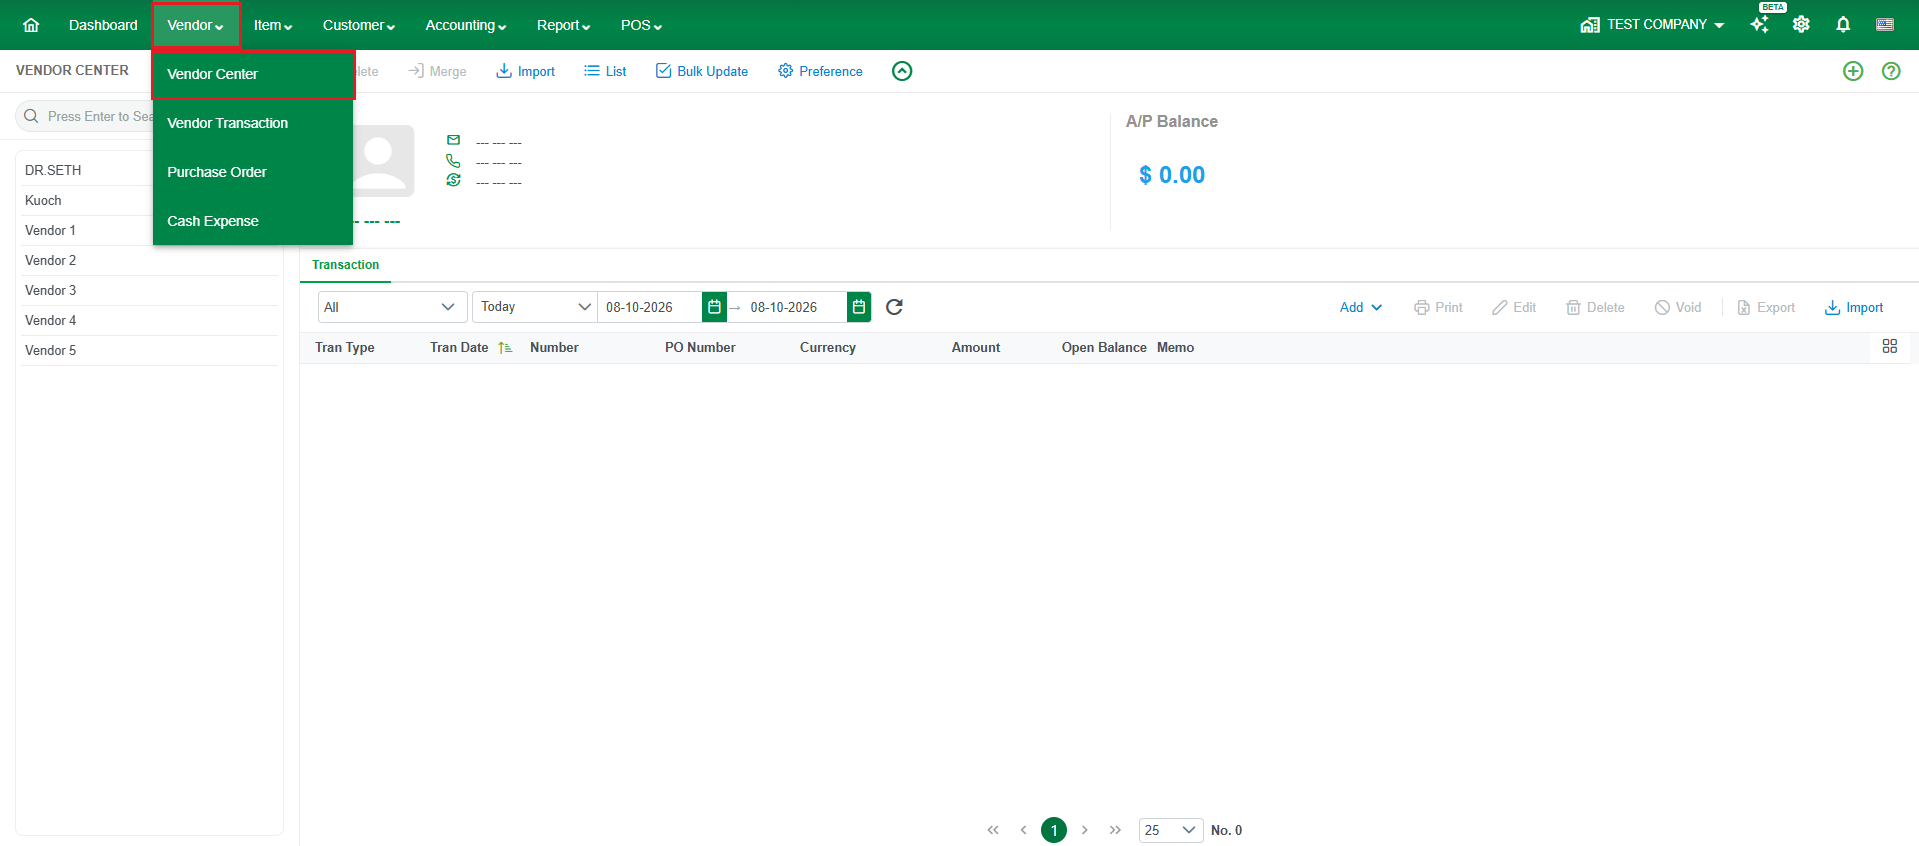
- Go to Vendor > Vendor Center and select the vendor.
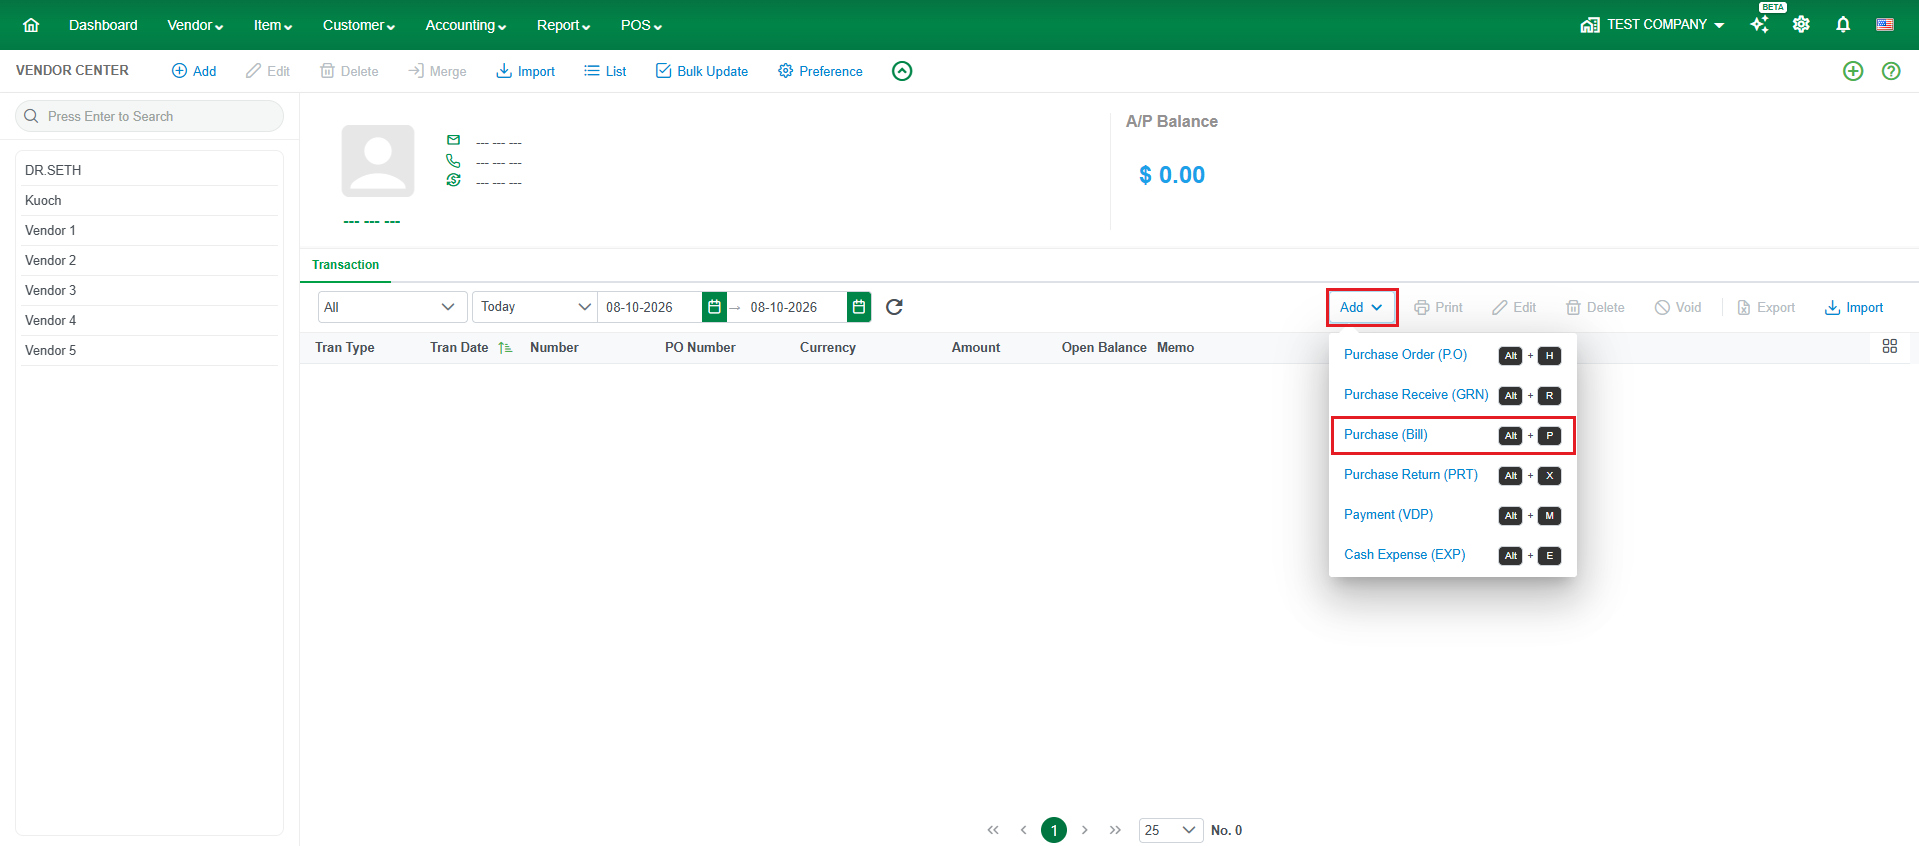
- On the Transaction tab, click Add, then click Purchase (Bill). The Add Purchase form opens.
Other ways to open the same form:
- Go to Vendor > Vendor Transaction, click Add and choose Purchase (Bill).
- Click New Transaction on the home page and choose Purchase.
- On the home page, in How LocalizeBook works > Purchase, click the info icon on Purchase Bill, then click New Purchase.
- Press Alt + P (keyboard shortcut).
Step 2: Pull in a purchase order or goods received (optional)
- Select the Vendor. Warehouse, A/P Account and Currency have default values; change them if needed.
- If you have a purchase order, click the button next to Purchase Order. If you recorded the goods with a Goods Received, click the button next to Purchase Receive instead.

- In the Purchase Order Pending or Purchase Receive Pending window, tick one or more documents. The Detail panel shows the items and quantities. In Purchase Receive Pending, the Date filter starts at Month to Date, so choose a wider range if you don't see the goods received.
- Click Select. The lines are copied into the bill.

If there is no purchase order or goods received, skip this step and enter the items directly.
Step 3: Fill in the bill header
Required fields are marked with *: Vendor, Warehouse, A/P Account, Currency, Date and Due Date.
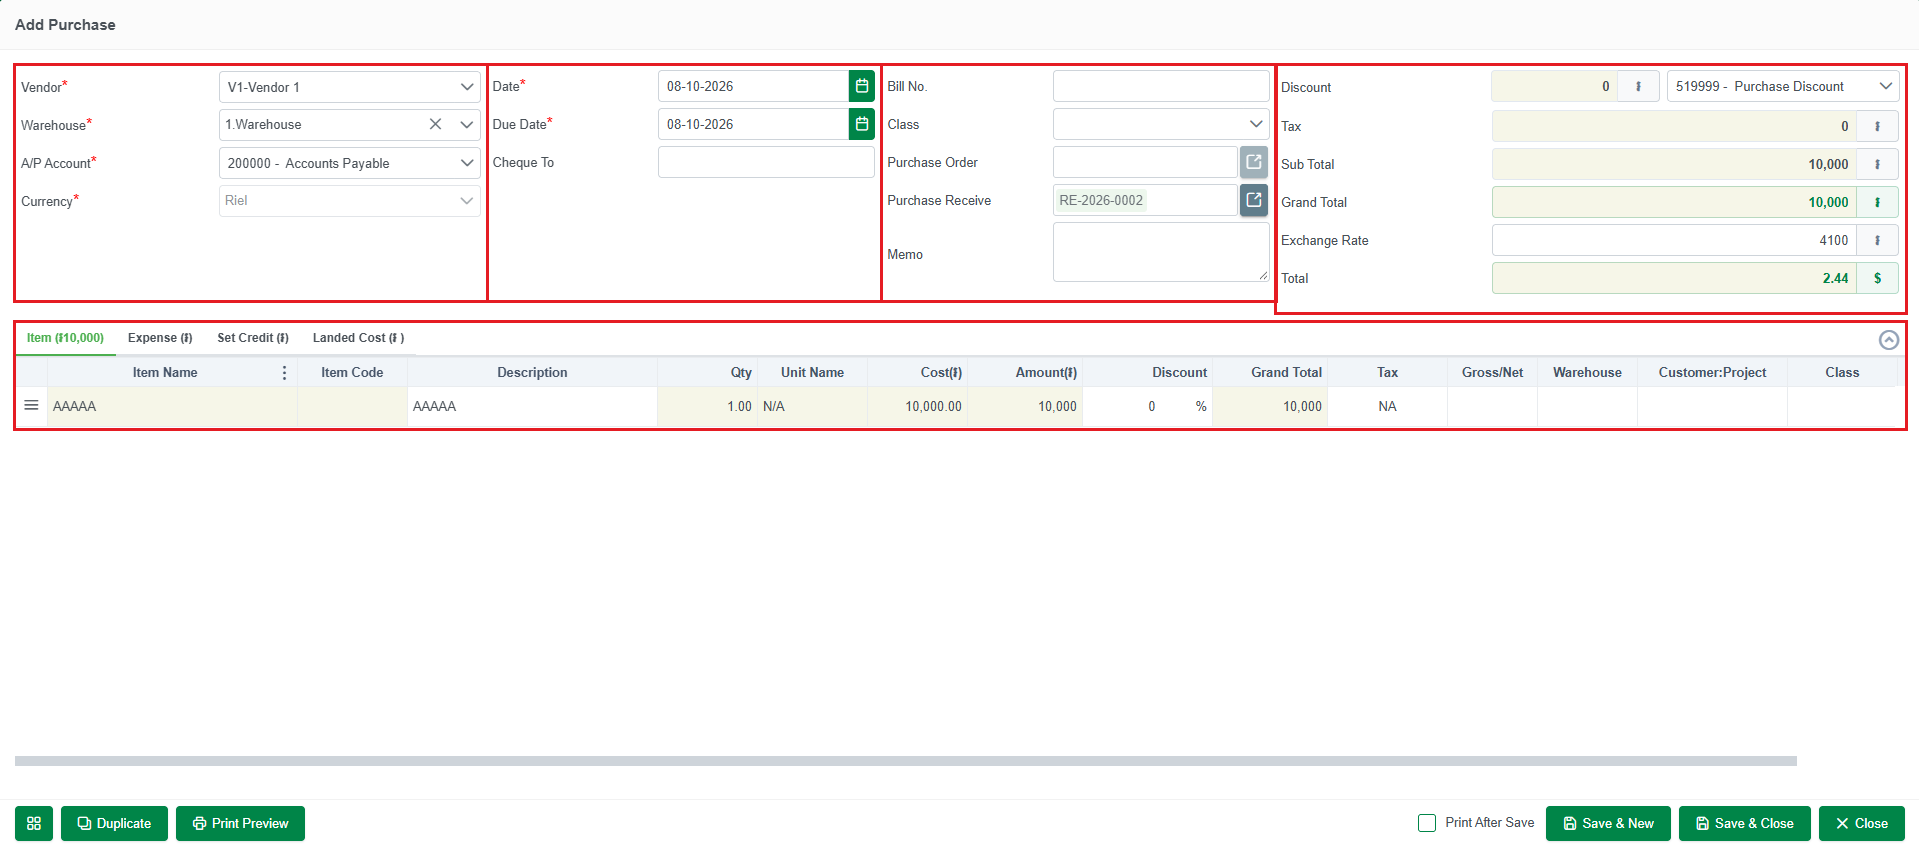
- Vendor* – the vendor who sent the bill.
- Warehouse* – the warehouse the items go into, for example 1.Warehouse.
- A/P Account* – the Accounts Payable account, for example 200000 - Accounts Payable.
- Currency* – the currency of the bill.
- Date* – the date of the vendor's bill. It defaults to today.
- Due Date* – the date the bill must be paid.
- Cheque To – the name to write on the cheque, if you pay by cheque.
- Bill No. – the vendor's invoice number, for example INV-1001. It is shown as the Number in Vendor Transaction.
- Purchase Order and Purchase Receive – the purchase order or goods received you pulled in.
- Memo – notes about the purchase.
- Discount – a discount on the whole bill. Choose the discount account in the list next to it, for example 519999 - Purchase Discount.
- Tax, Sub Total and Grand Total – calculated automatically.
Step 4: Enter the lines on the tabs
- Item ($) – items you bought: Item Name, Item Code, Description, Qty, Unit Name, Cost, Amount, Discount (% or amount), Grand Total, Tax and Warehouse. Lines from a goods received keep their received quantity; lines from a purchase order can be changed. You can add more lines below them.
- Expense ($) – costs without an item, such as services, rent or utilities: Memo, Amount, Account and Tax.
- Set Credit ($) – offsets the bill with the vendor's open credits, such as a Purchase Return, a credit note or an Advance to Supplier. Tick a credit and enter the Pay Amount. The columns are Tran Type, Tran Date, Number, Grand Total, Open Balance, Discount Account, Discount Amount, Pay Amount and Memo.
- Landed Cost ($) – extra costs such as freight or import charges that should be added to the cost of inventory you bought, with a PO Number column to link them to a purchase order.
To add each line, click the save icon at the end of the line; a new empty line appears. Click the delete icon to remove a line.
Step 5: Save the purchase bill
- Save & New – save the bill and start a new one.
- Save & Close – save the bill and close the form.
- Close – close without saving. LocalizeBook asks "Do you want to exit without saving?"
- Print After Save and Print Preview – print the bill.
- Duplicate – copy this bill to create a new one with the same details.
- Custom Display (grid icon at the bottom left) – choose which fields and columns appear on the form.
Landed cost: add freight or import costs to inventory
When a separate bill (for example a freight bill from a transport company) should increase the cost of items you bought, use Allocate Landed Cost from that bill's row menu in Vendor Transaction. In the Allocate Landed Cost window:
- Choose the Allocation Method: Value, Qty or Other Cost Driver.
- Under Landed Cost Bill, the charge to allocate is listed (Vendor, Bill No., Item, Currency, Amount). You can add more by PO Number, Vendor, Bill No. or Item.
- Under Bill Inventory, choose the Vendor and Bill No. of the inventory bill. The Allocation Detail shows each item's Percent, Qty, Cost, Amount, Charge and New Cost.
- Click Save. The landed cost gets a number such as LC-0001, shown in the freight bill's row menu.
Example: a $30.00 freight charge allocated to 10 units of Coffee Beans 1kg costing $12.00 each changes the cost to $15.00 per unit.
How to pay a purchase bill
Go to Vendor > Vendor Transaction, click the arrow at the end of the bill's row and choose Payment (VDP). Or create a new Payment (press Alt + M) and tick the bill. See the Payment article for details.
How to find, edit, void or delete a purchase bill
Find a purchase bill
Go to Vendor > Vendor Transaction. Set the date filter to All Date (it starts at Today) and, in the transaction type filter, tick only Bill. Bills show Tran Type Bill, the Bill No. as Number, the PO Number, the Amount and the Open Balance (the amount still to pay).
Click the arrow at the end of a bill's row to open its menu: Print, Payment (VDP), Payment Information, Duplicate, Journal Report (the accounting entries), the linked purchase order number, Allocate Landed Cost and Transaction Log.
Edit, void or delete
In Vendor > Vendor Center, select the vendor, open the Transaction tab (set the date to All Date to see older purchase bills), click the purchase bill, then click Edit, Void or Delete above the list. The same buttons are above the list in Vendor > Vendor Transaction.
- Edit – change the purchase bill, then click Save & Close.
- Void – cancels the purchase bill but keeps it in the list, shown in red.
- Delete – removes the purchase bill completely.
Note: A purchase bill with a payment applied can still be edited, but can't be voided or deleted.
Frequently asked questions about purchase bills
What is a purchase bill in LocalizeBook?
A Purchase (Bill) records the vendor's invoice for goods or services and the amount you owe the vendor (Accounts Payable).
Do I need a purchase order or goods received before a bill?
No. Both are optional. You can enter a Purchase (Bill) directly with the items or expenses.
Does a purchase bill increase my stock?
Yes, for items that were not already received with a Goods Received. If the bill is made from a Goods Received, the stock was already added by the GRN and is not added again.
How do I record a bill for a service or expense without an item?
Use the Expense ($) tab: enter a Memo, the Amount and the expense Account. For an expense you pay immediately, you can use a Cash Expense instead.
How do I use a purchase return or vendor credit on a bill?
On the bill's Set Credit ($) tab, tick the credit and enter the Pay Amount. The bill's open balance goes down.
How do I use an advance I paid to the vendor?
On the bill's Set Credit ($) tab, tick the Advance to Supplier and enter the Pay Amount.
What is the Bill No. field?
The vendor's own invoice number. It is shown in the Number column of Vendor Transaction, so you can find the bill by the vendor's invoice number.
How do I record a discount from the vendor?
Enter a line discount in the Discount column, or a discount on the whole bill in the header Discount field with a discount account such as Purchase Discount.
How do I add freight to the cost of my items?
Use landed cost: on the freight bill's row menu in Vendor Transaction, choose Allocate Landed Cost and choose the inventory bill to allocate it to.
How do I pay a bill?
In Vendor Transaction, open the bill's row menu and choose Payment (VDP), or create a new Payment and tick the bill.
Why can't I void or delete a bill?
A purchase bill with a payment applied can't be voided or deleted. It can still be edited.
Why can't I find a bill I created?
The date filter in Vendor Transaction starts at Today. Change it to All Date and tick Bill in the transaction type filter.
What is the keyboard shortcut for a new purchase bill?
Press Alt + P to open a new purchase bill.