An Invoice in LocalizeBook charges the customer for goods or services. It records the sale and the amount the customer owes you (Accounts Receivable). Use an invoice when you sell on credit or the customer pays later. An invoice lists the items or services, their prices, any tax, the total amount and the Due Date by which the customer must pay. An invoice is also called a sales invoice or tax invoice.
Where an invoice fits in the sales process
The sales process in LocalizeBook is: Customer → Quotation (optional) → Sale Order (optional) → Sale Delivery (GDN, optional) → Invoice → Collection (CMP).
- Create an invoice when you sell on credit or the customer will pay later.
- The invoice records the sale and the amount the customer owes you in Accounts Receivable (A/R).
- When the customer pays, record the payment with a Collection (CMP).
- If the customer pays immediately, use a Sale Receipt instead. It records a cash sale in one step.
- You can create an invoice from a sale delivery, a sale order or a quotation, or on its own without any of them.
Invoice types
- Tax Invoice – issued to a legal entity (a business).
- Commercial Invoice – issued to a physical person (an individual).
- Standard Invoice – an internal invoice, if your company uses it.
Each invoice type has its own numbering, for example TI-2026-0001 for a Tax Invoice and CI-2026-0001 for a Commercial Invoice. See the Invoice Type article for details.
Ways to add an invoice
- Create Invoice – add one invoice at a time using the steps below.
- Batch Invoice & Sale Return – add many unpaid invoices at once. See the Batch Invoice & Sale Return article.
- Batch Sale Receipt – add many sales at once when the customers have already paid.
How to create an invoice
Step 1: Open the Add Invoice form
- Go to Customer > Customer Center.
- Select the customer in the list on the left.
- On the Transaction tab, click Add, then click Invoice.
Other ways to open the same form:
- Go to Customer > Customer Transaction, click Add and choose Invoice.
- Click New Transaction on the home page and choose Invoice under Customer.
- On the home page, in How LocalizeBook works > Sales, click the info icon on Invoice, then click New Invoice.
- Press Alt + I (keyboard shortcut).
Step 2: Pull in a sale delivery, sale order or quotation
If you already delivered the goods with a sale delivery, pull it in so you don't have to type the items again:
- Select the Customer.
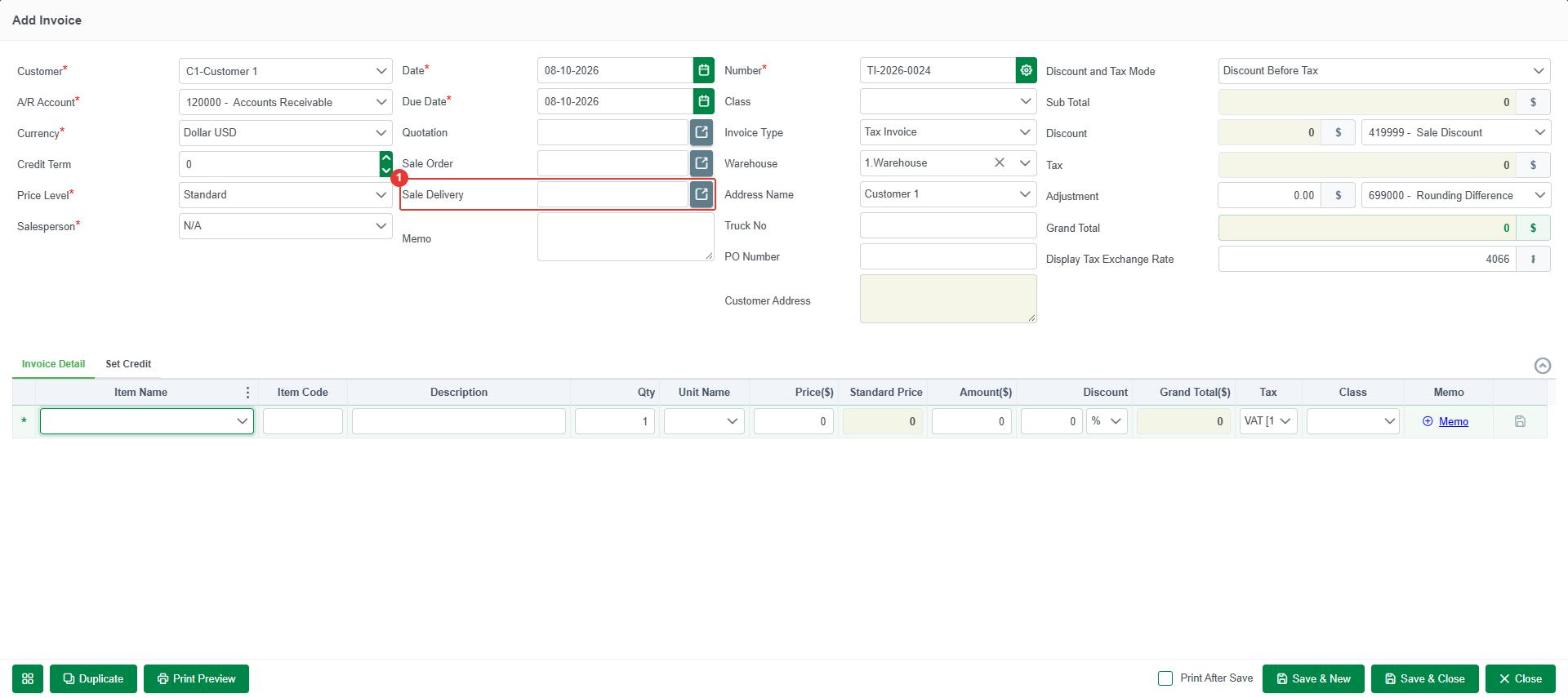
- Click the button next to Sale Delivery (number 1 in the screenshot).
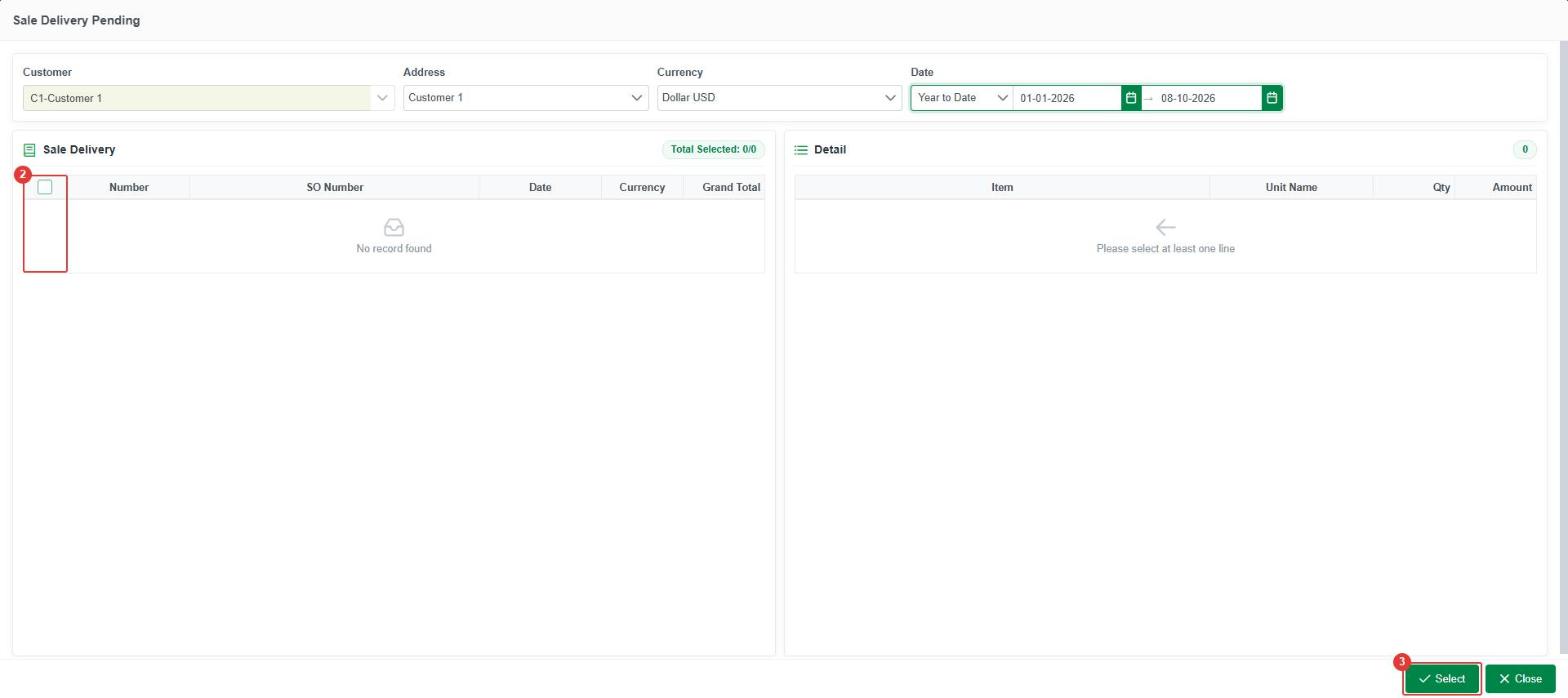
- In the Sale Delivery Pending window, tick one or more sale deliveries (number 2). The Detail panel shows each item, Unit Name, Qty and Amount. The Date filter in this window starts at Month to Date, so choose a wider range to see older deliveries.
- Click Select (number 3).
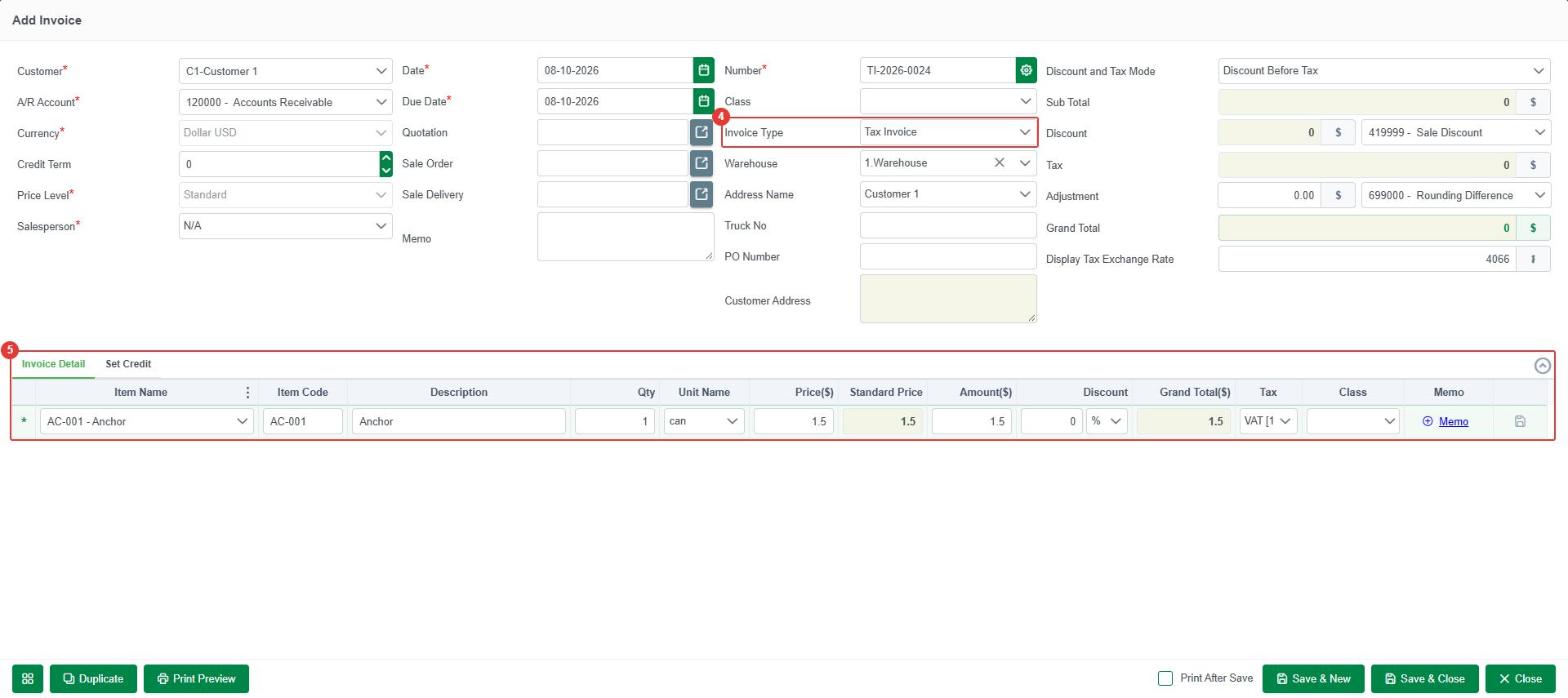
- Choose the Invoice Type (number 4). The items from the sale delivery are copied into the Invoice Detail (number 5).
To invoice straight from a sale order, click the button next to Sale Order, tick the sale orders in the Sale Order Pending window and click Select. To invoice from a quotation, click the button next to Quotation and choose the quotation in the Quotation Pending window.
If there is no sale delivery, sale order or quotation, skip this step and enter the items directly in the Invoice Detail.
Step 3: Check the invoice fields
Required fields are marked with *: Customer, A/R Account, Currency, Price Level, Salesperson, Date, Due Date and Number.
Customer and account fields
- Customer* – the customer you are billing. When you select a customer, LocalizeBook fills in the customer's settings, such as Currency, Price Level and Address Name. A green note under the field shows which values came from the customer. To create a new customer, click + Add at the top of the list.
- A/R Account* – the Accounts Receivable account that records what the customer owes, for example 120000 - Accounts Receivable.
- Currency* – the currency of the invoice.
- Credit Term – the number of days the customer has to pay. The Due Date is calculated from it automatically (for example, Credit Term 30 sets the Due Date 30 days after the invoice Date).
- Price Level* – the price list used for the items, for example Standard or Wholesale.
- Salesperson* – the salesperson for this invoice. Choose N/A if there is none.
Date and source fields
- Date* – the invoice date. It defaults to today.
- Due Date* – the date the customer must pay by. It is calculated from the Credit Term; you can also change it.
- Quotation, Sale Order and Sale Delivery – the transactions this invoice comes from, if any. Use the button next to each field to pull one in.
- Memo – notes about the whole invoice.
Number, type and delivery fields
- Number* – the invoice number, created automatically and following the last number (for example TI-2026-0002). To change the numbering, click the gear icon next to the number. The format window is named after the invoice type, for example Format Tax Invoice No, where you can set Auto Generate, Allow Edit Ref Num, Allow Duplicate, Auto Increment from Last Transaction, the Prefix, the year format, the Sequence Size and Reset By.
- Invoice Type – Tax Invoice or Commercial Invoice (and Standard Invoice if your company uses it).
- Warehouse – the warehouse the goods come from.
- Class – shown only in companies that track classes.
- Address Name – the customer address for the invoice, filled in from the customer.
- Truck No – the truck or vehicle number for the delivery, if needed.
- PO Number – the customer's purchase order number.
Discount, tax and total fields
- Discount and Tax Mode – how discount and tax are calculated: Discount Before Tax (default), Discount After Tax or Discount on Net.
- Sub Total – the total of the item lines.
- Discount – a discount amount for the whole invoice, with the account it is recorded to (for example 419000 - Sale Discount).
- Tax – the total tax, calculated from the lines.
- Adjustment – an optional amount to adjust the total, with its account (for example 699000 - Rounding Difference). Show or hide it with Custom Display.
- Grand Total – the amount the customer owes for this invoice.
- Display Tax Exchange Rate – the exchange rate used to show the tax in a second currency on the invoice (for example 4065). It is filled in for you, and you can change it.
Invoice Detail (item lines)
- Item Name – the item or service sold. Item Code and Description fill in automatically. To create a new item, click + Add at the top of the list.
- Qty – the quantity sold.
- Unit Name – the unit of measure.
- Price($) – the selling price, taken from the Price Level. You can change it.
- Standard Price – the item's standard price, shown for comparison. Read-only.
- Amount($) – Qty × Price.
- Discount – a discount for the line, as a percentage (%) or an amount. Click the Discount All icon in the column header to apply one discount to every line.
- Grand Total($) – the line total after discount.
- Tax – the tax for the line, for example VAT [10%], or NA for no tax.
- Memo – a note for this line only.
To add each line, fill it in and click the save icon at the end of the line. The line is added and a new empty line appears for the next item. To remove a line, click its red delete icon. To change the order of the lines, drag the handle (≡) at the start of a line.
Set Credit tab
The Set Credit tab lists the customer's open credits with Tran Type, Tran Date, Number, Grand Total and Open Balance. To use a credit against this invoice, tick it and enter the Pay Amount. The tab also has Discount Account, Discount Amount and Memo columns.
Step 4: Save the invoice
- Save & New – save the invoice and start a new one.
- Save & Close – save the invoice and close the form.
- Close – close without saving. LocalizeBook asks "Do you want to exit without saving?"
- Print After Save – tick this box to print the invoice right after saving.
- Print Preview – see and print the invoice. See the How to Print an Invoice or Any Transaction article.
- Duplicate – copy this invoice to create a new one with the same details.
- Custom Display (grid icon at the bottom left) – choose which fields and columns appear on the form, for example Region, Remark, Address, Adjustment or the On Hand column.
How to receive payment for an invoice
When the customer pays, record a Collection (CMP): in Customer > Customer Center, select the customer, click Add on the Transaction tab and choose Collection (CMP), or press Alt + O. The unpaid amount of each invoice is shown in the Open Balance column, and the customer's total is shown as A/R Balance in Customer Center.
How to show other taxes on the invoice
If you need to display additional applicable taxes, such as Accommodation Tax, Specific Tax or Public Lighting Tax (PLT), on the invoice, enable the Tax Group option in the invoice template:
- Go to Settings.
- Select Invoice Template.
- Select the Tax Invoice template and click Edit.
- Select the Table tab.
- Scroll down to the Total section.
- Tick Tax Group.
- Click Save.
Once Tax Group is enabled, the applicable tax types are displayed on the invoice when they are applied to the transaction.
Note: The tax types displayed depend on the taxes applicable to the transaction. For example, Accommodation Tax, Specific Tax or Public Lighting Tax (PLT) only appear when applicable.
How to find, edit, void or delete an invoice
Find an invoice
- Go to Customer > Customer Transaction. Set the transaction type filter to Invoice and the date to All Date (the date filter starts at Today). The list shows Customer, Tran Type, Tran Date, Number, SO Number, Currency, Amount, Open Balance and Memo.
- Or go to Customer > Customer Center, select the customer, open the Transaction tab and set the date to All Date.
Edit, void or delete an invoice
In Customer > Customer Center, select the customer, open the Transaction tab (set the date to All Date to see older invoices), click the invoice, then click Edit, Void or Delete above the list.
- Edit – change the invoice, then click Save & Close.
- Void – cancels the invoice but keeps it in the list, shown in red.
- Delete – removes the invoice completely.
Note: An invoice with a payment applied can still be edited, but can't be voided or deleted.
Invoice reports
To review your sales, go to Report > Sales & Receivables > Sale Report. To see what customers owe you, use Report > Sales & Receivables > A/R Report.
Frequently asked questions about invoices
What is the difference between an invoice and a sale receipt?
An Invoice is for a sale the customer pays later; it records the amount owed in Accounts Receivable, and you record the payment later with a Collection (CMP). A Sale Receipt is for a cash sale that is paid immediately, in one step.
What is the difference between a Tax Invoice and a Commercial Invoice?
A Tax Invoice is issued to a legal entity (a business). A Commercial Invoice is issued to a physical person (an individual). Choose the type in the Invoice Type field.
Does an invoice record income and accounts receivable?
Yes. An invoice records the sale and the amount the customer owes you in Accounts Receivable (the A/R Account on the invoice).
Do I need a sale order or sale delivery before I create an invoice?
No. You can create an invoice on its own, or pull in a quotation, sale order or sale delivery to copy the items.
How do I invoice a sale delivery?
In the Add Invoice form, select the customer, click the button next to Sale Delivery, tick the delivery in the Sale Delivery Pending window and click Select.
How do I invoice a sale order without a sale delivery?
Click the button next to Sale Order, tick the sale order in the Sale Order Pending window and click Select.
Can one invoice include several sale deliveries?
Yes. In the Sale Delivery Pending window, tick all the sale deliveries for that customer that you want to invoice together, then click Select.
Why can't I see my sale delivery in the Sale Delivery Pending window?
The Date filter in that window starts at Month to Date. Choose a wider date range, and check that the Customer, Address and Currency filters match the delivery.
How is the Due Date calculated?
The Due Date is the invoice Date plus the Credit Term in days. For example, an invoice dated 17-11-2026 with Credit Term 30 is due on 17-12-2026.
How do I record a payment for an invoice?
Create a Collection (CMP) for the customer (Alt + O). The invoice's Open Balance goes down by the amount paid.
How do I apply a customer credit to an invoice?
Open the Set Credit tab in the invoice, tick the credit and enter the Pay Amount.
How do I add a discount to the whole invoice?
Enter the amount in the header Discount field and choose the discount account. To give the same percentage discount on every line, click the Discount All icon in the Discount column header.
How do I show Accommodation Tax, Specific Tax or PLT on the invoice?
Turn on Tax Group in the Tax Invoice template: Settings > Invoice Template > Tax Invoice > Edit > Table tab > Total section > tick Tax Group > Save.
How do I change the invoice number format?
In the Add Invoice form, click the gear icon next to Number, change the settings and click Save. Each invoice type has its own number format.
Why can't I find an invoice I created?
The date filter starts at Today. In Customer Transaction or Customer Center, change the date to All Date.
Why can't I void or delete an invoice?
An invoice with a payment applied can't be voided or deleted. You can still edit it.
What is the keyboard shortcut for a new invoice?
Press Alt + I to open a new invoice.