Typically, “landed cost” refers to costs connected with international shipping, like taxes and fees. If your business ships to international customers regularly or imports or exports goods, then you’ll need to know the landed cost for each different type of product to achieve optimal pricing on your merchandise.
Landed cost is an important calculation for small business owners. The earlier you know your international shipping expenses, the earlier you can plan for how to cover them, make a profit, and maintain competitive prices.
There are two ways of Allocate Landed Cost in Localizebook:
- Allocate landed cost on function Landed Cost Allocation.
- Allocate Landed Cost by Vendor.
Before making a Landed Cost Allocation
Step 1: Create an item for any cost that needs to be allocated with the cost of your product. When you create an item, the item type you need to choose as a service and chart of account you choose as cost of sales.
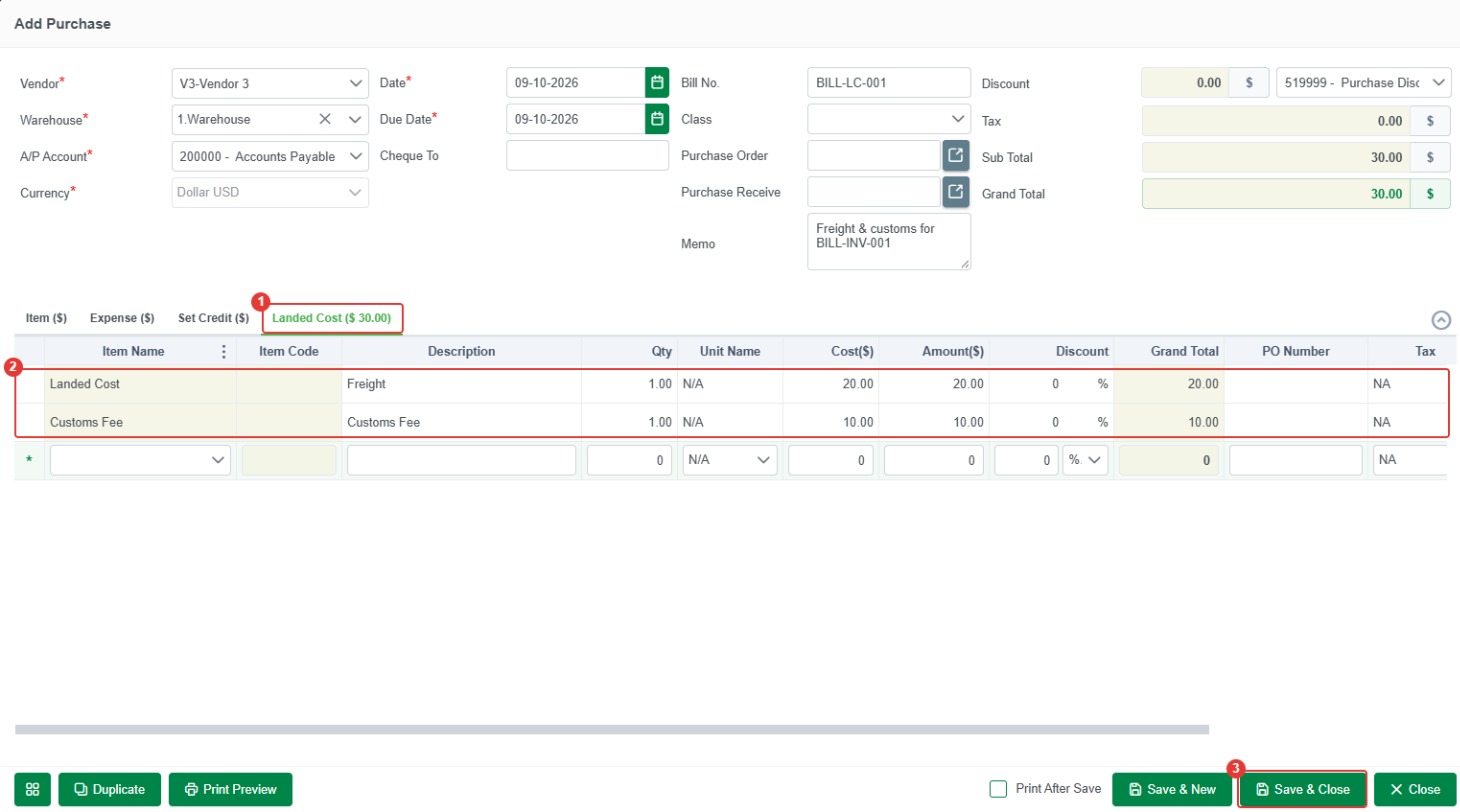
Step 2: Record the landed cost bill (for example, the freight invoice) as a normal Purchase (Bill), and add the cost item on the Landed Cost tab of the bill.
 Landed Cost Allocation
Go to allocate landed cost on function Landed Cost Allocation in Localizebook:
- Go to the Accounting menu.
- Click on Landed Cost Allocation.
- Click on button +Add in the top-right of the page:
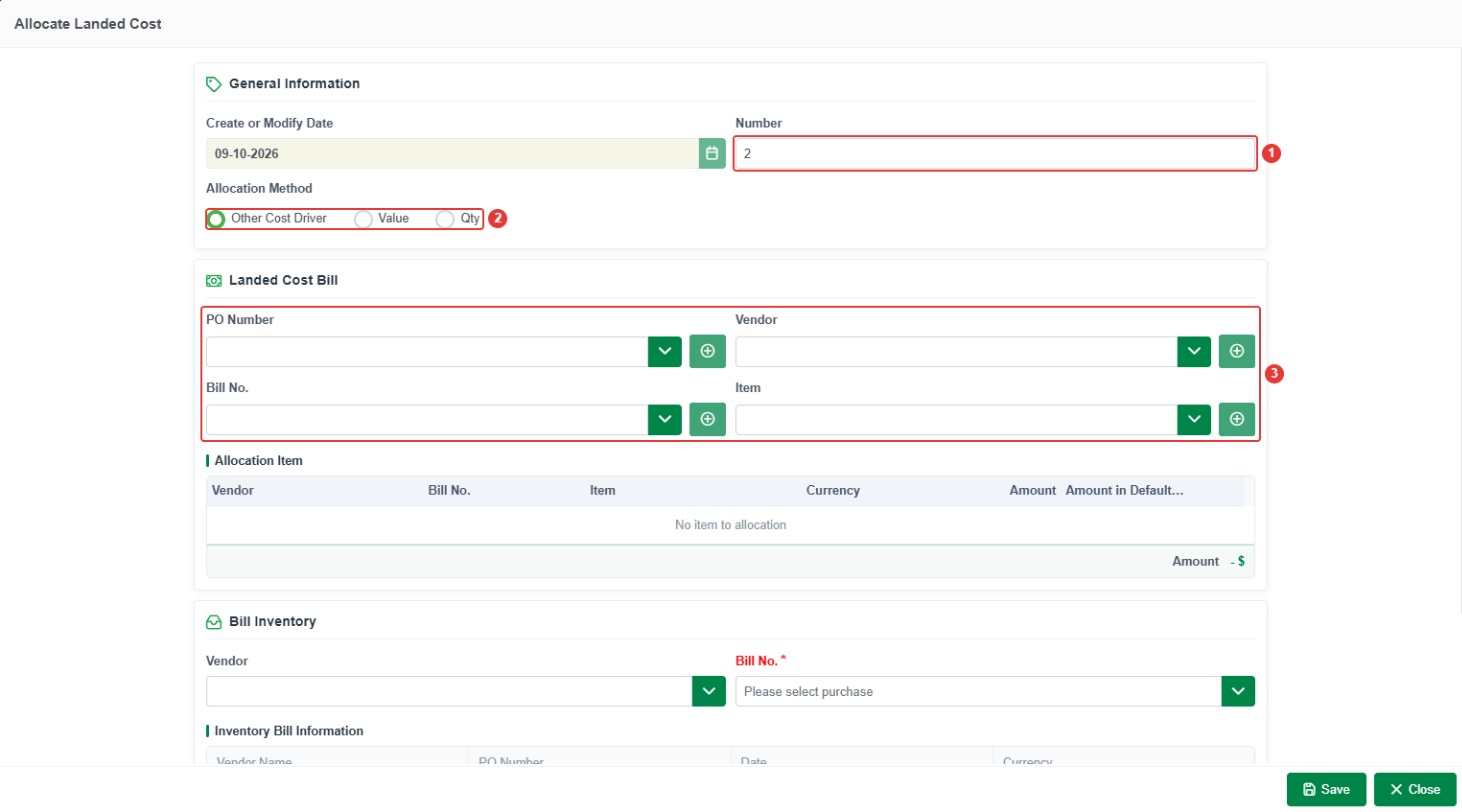
1.Set your number reference.
2.Choose the allocation method “Value, Qty, or Other Cost Driver”.
3.Enter the basic information of Landed Cost Bill “Vendor, Bill No., and Item”
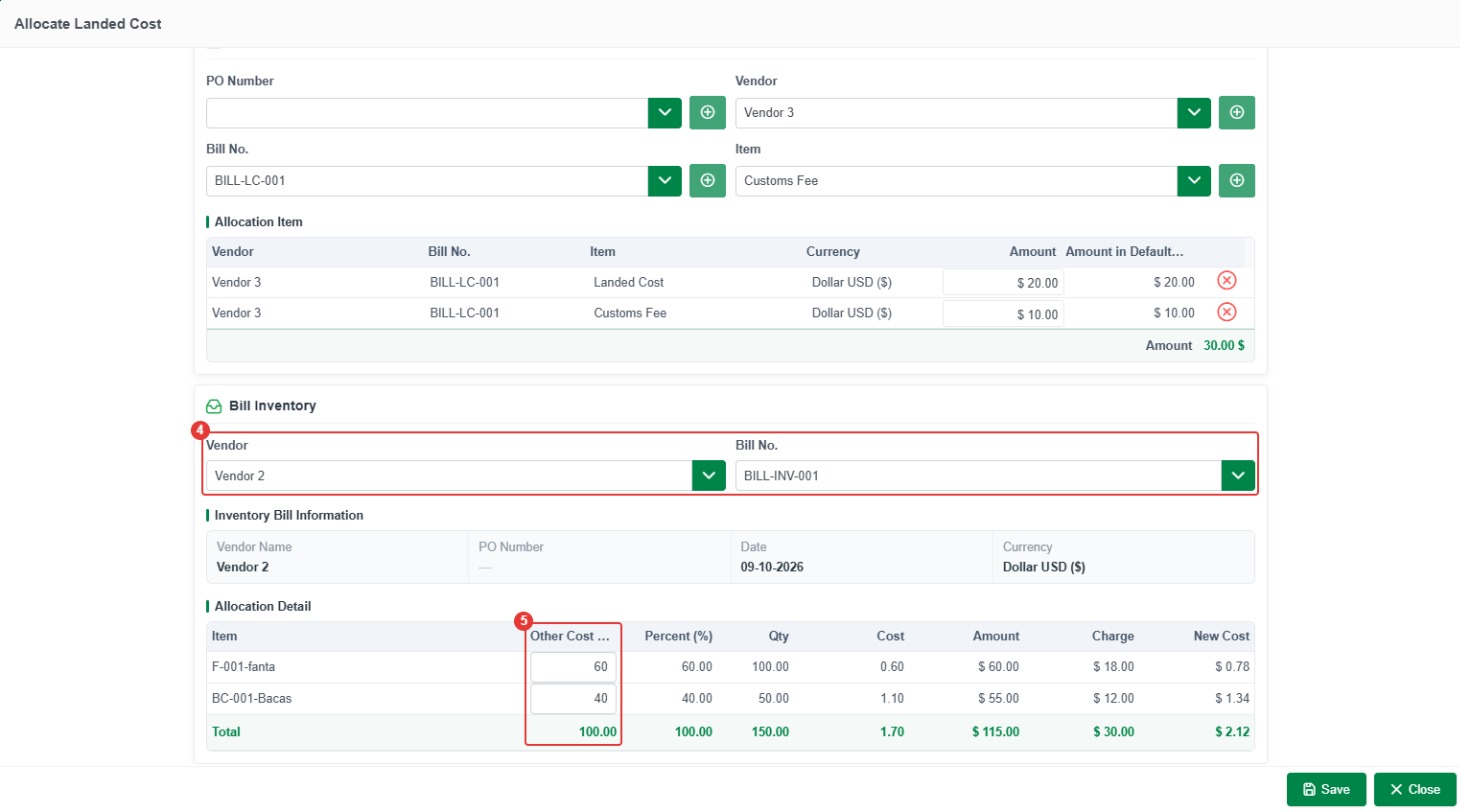
4.Enter the basic information of Bill Inventory “Vendor and Bill No.”
5.If you chose Other Cost Driver, enter a value for each item in the “Other Cost Driver” column.
- After filling all with your information:
- Save: Save the landed cost allocation and close the window.
- Close: Close window without saving the landed cost allocation.
 Landed Cost by Vendor
Go to allocate landed cost on Vendor in Localizebook:
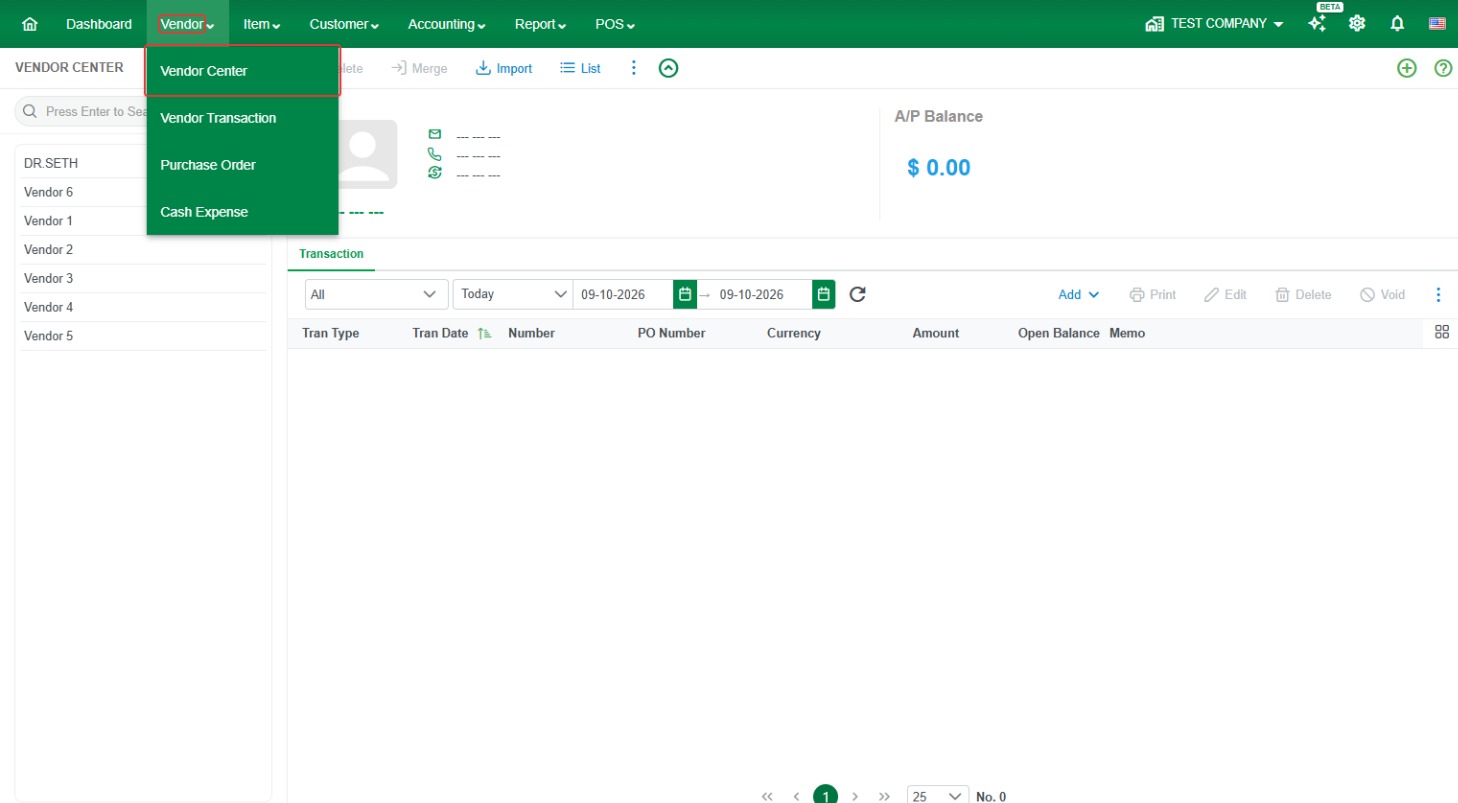
- Go to the Vendor menu.
- Click on Vendor Center.
- Select on Name Vendor.
- Select on the Bill transaction that you want to include landed cost.
- Click on button and select on Allocate Landed Cost:
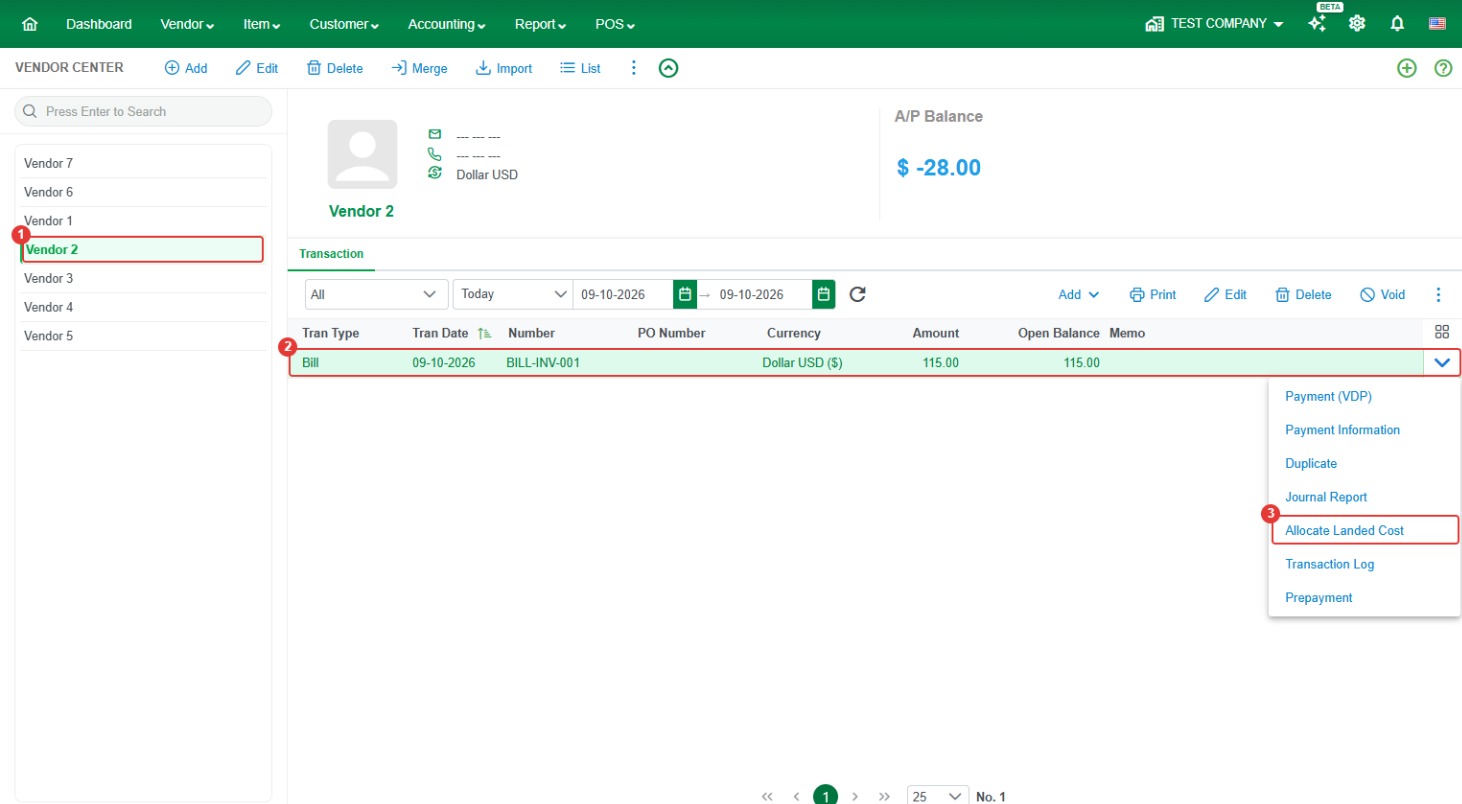
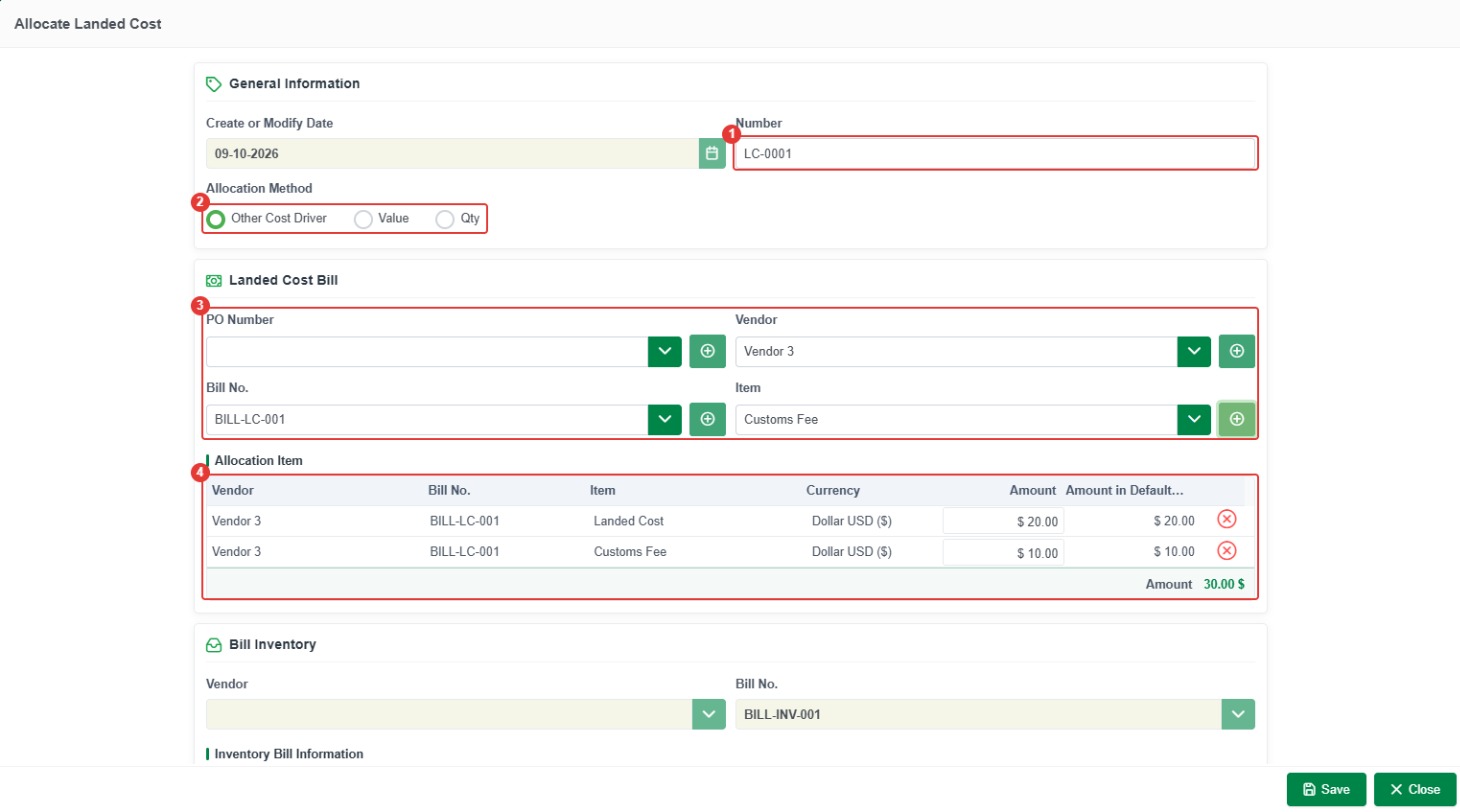
- You will be redirect to this below page:
- Set your number reference.
- Choose the allocation method “Value, Qty, or Other Cost Driver”.
- Enter the basic information of Landed Cost Bill “Vendor, Bill No., and Item”
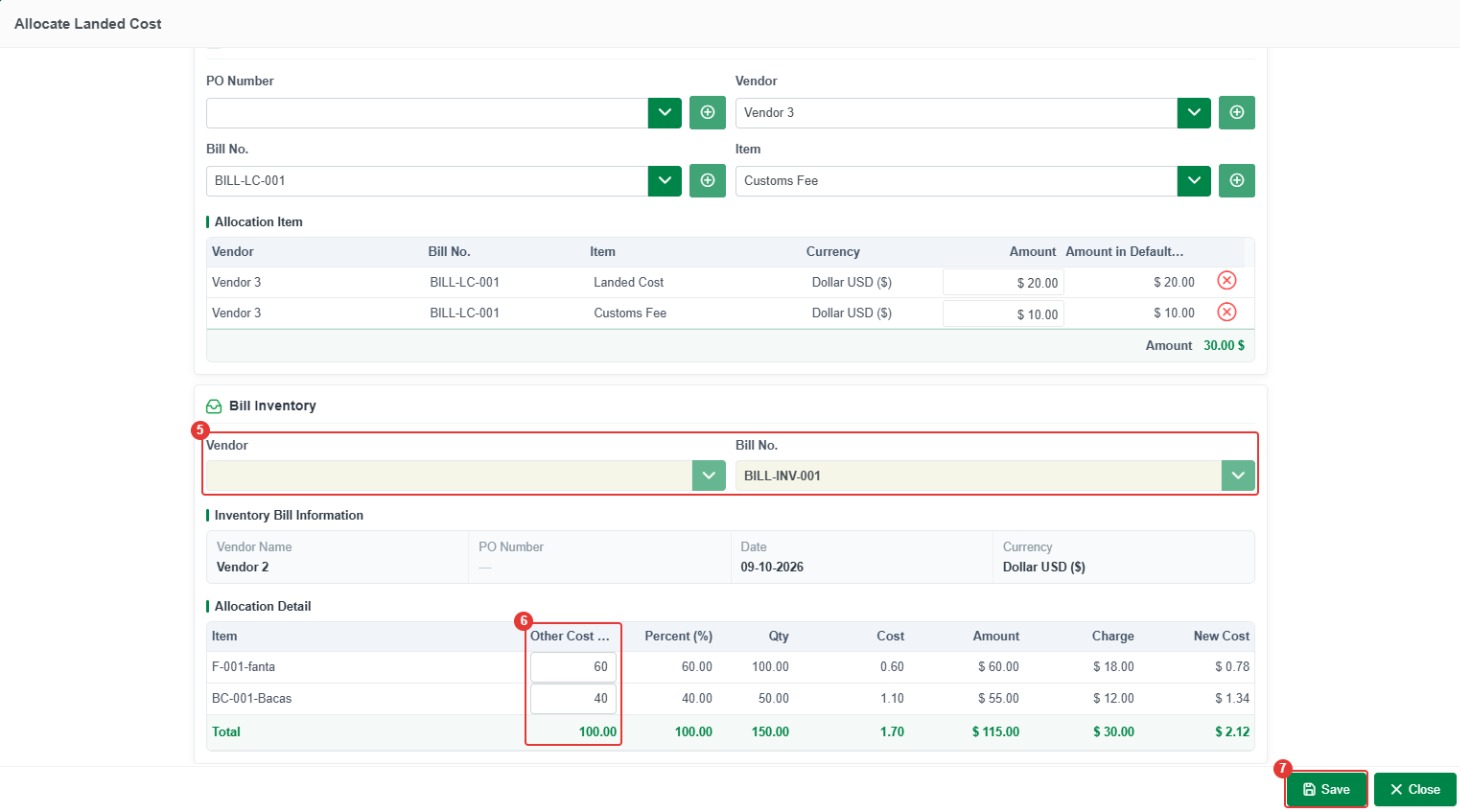
- If you chose Other Cost Driver, enter a value for each item in the “Other Cost Driver” column.
- After filling all with your information:
- Save: Save the landed cost allocation and close the window.
- Close: Close window without saving the landed cost allocation.
 Edit or Delete a Landed Cost Allocation
In Accounting > Landed Cost Allocation, set the date range to see older allocations, click the landed cost allocation, then click Edit or Delete above the list.
- Edit: change the landed cost allocation, then click Save.
- Delete: removes the landed cost allocation completely.
How Landed Cost Adjusts Your Item Cost
When you allocate a landed cost bill, LocalizeBook adds the extra cost (such as freight, customs duty or other import fees) to the cost of the items on your goods bill. The item cost and your stock value go up, so your cost of goods sold and profit are correct when you sell the items.
Example
- Goods bill INV-1001 from Green Bean Trading: 10 kg of Coffee Beans at $12, total $120.
- Landed cost bill FRT-1001 from Express Logistics: Freight Charge $30.
- After the allocation, the coffee beans cost $150 in total, so the new cost is $15 per kg ($150 ÷ 10 kg) instead of $12.
You can check this in the Allocation Detail table before you save: the Charge column shows the landed cost given to each item ($30.00), and the New Cost column shows the new unit cost ($15.00).
Allocation Methods
- Value: splits the landed cost by the amount of each item on the goods bill. Items with a higher amount get a bigger share.
- Qty: splits the landed cost by quantity, so each unit gets the same share.
- Other Cost Driver: you enter your own number for each item (for example, weight or volume), and the cost is split by those numbers.
What Happens in Your Accounts
- When you save the landed cost bill, its amount is recorded in the account of the cost item (for example, Other Cost of Sales) and in Accounts Payable for the shipping vendor.
- When you save the allocation, LocalizeBook moves that amount out of the cost item's account and into your Inventory Asset account, on the items of the goods bill.
In the example, the Journal Report of the allocation shows: Inventory Asset (Coffee Beans 1kg) debit $150.00, Accounts Payable (Green Bean Trading) credit $120.00, and Other Cost of Sales (Freight Charge) credit $30.00.
To see it, go to Accounting > Landed Cost Allocation, open the menu at the end of the row, and click Journal Report.
Check the Result in Stock Valuation
Go to Report > Stock > Stock Valuation. After the allocation, the stock value of the item includes the landed cost. In the example, the Coffee Beans stock value went from $2,320.00 to $2,350.00, and its average cost went from 10.09 to 10.22.
Tips and Common Questions
- I can't see the Landed Cost tab on the bill. Turn on Active Landed Cost in Settings > Preference > Item (in the Transaction section), then click Save.
- My cost item doesn't appear on the Landed Cost tab. Only Service items can be used as landed cost. Open the item and set its Item Type to Service.
- My freight bill doesn't appear under Landed Cost Bill. Only bills with a line on the Landed Cost tab appear there. Check that the cost was entered on the Landed Cost tab of the bill, not on the Item or Expense tab.
- I saved an allocation but can't find it in the list. The Landed Cost Allocation list is filtered by the purchase date of the goods bill. Change the date range (for example, This Week or Year to Date) so it includes that date.