Prepayment is an amount paid in advance for goods or services that have not yet been received or consumed. Since the benefit has not yet been realized, the payment is initially recorded as an asset on the Balance Sheet. As the goods are received or the services are provided over time, the prepaid amount is gradually recognized as an expense.
Before using the Prepayment feature, go to Settings and activate Prepayment.
Create Account Chart
Create an Prepayment account to record customer payments received in advance.
- Go to Accounting → Chart of Accounts.
- Click Add.
- Set the Account Type to Other Current Asset.
- Enter the Account Code and Account Name (e.g., Prepayment ).
- Complete any additional information as needed.
- Click Save & Close or Save & New.
Note: The Prepayment account must be created as an Other Current Asset account.

Create a Prepayment Service Item
To use the Prepayment feature, you must create a service item linked to a prepayment asset account.
- Go to Items → Add Item.
- Set Item Type to Service.
- Enter the required item details, such as Name and Item Group.
- In the Account field, select a Chart of Account with the account type Other Current Assets (e.g., Prepayment).
- Click Save & Close or Save & New.
Note: The selected account must be created as an Other Current Assets account in your Chart of Accounts. This ensures that advance payments are recorded as assets and recognized as expenses over time.

Create a Prepayment Purchase
Once you have created the prepayment service item, you can record a prepayment purchase.
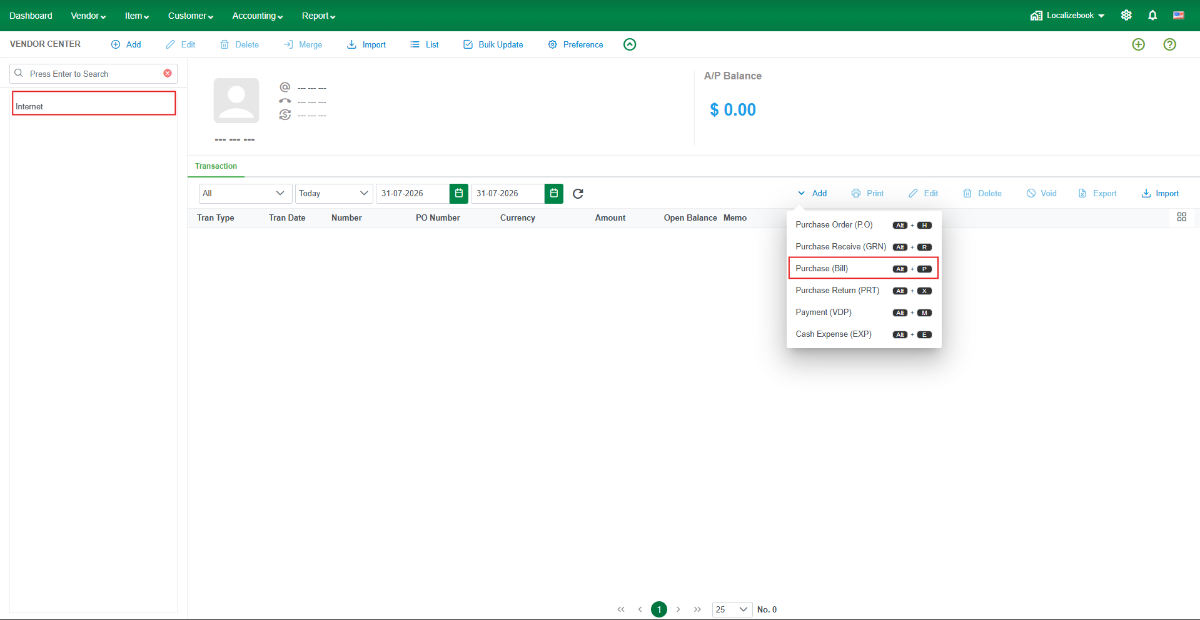
- Go to Vendor Center and select the vendor.
- Click Add → Purchase (Bill).
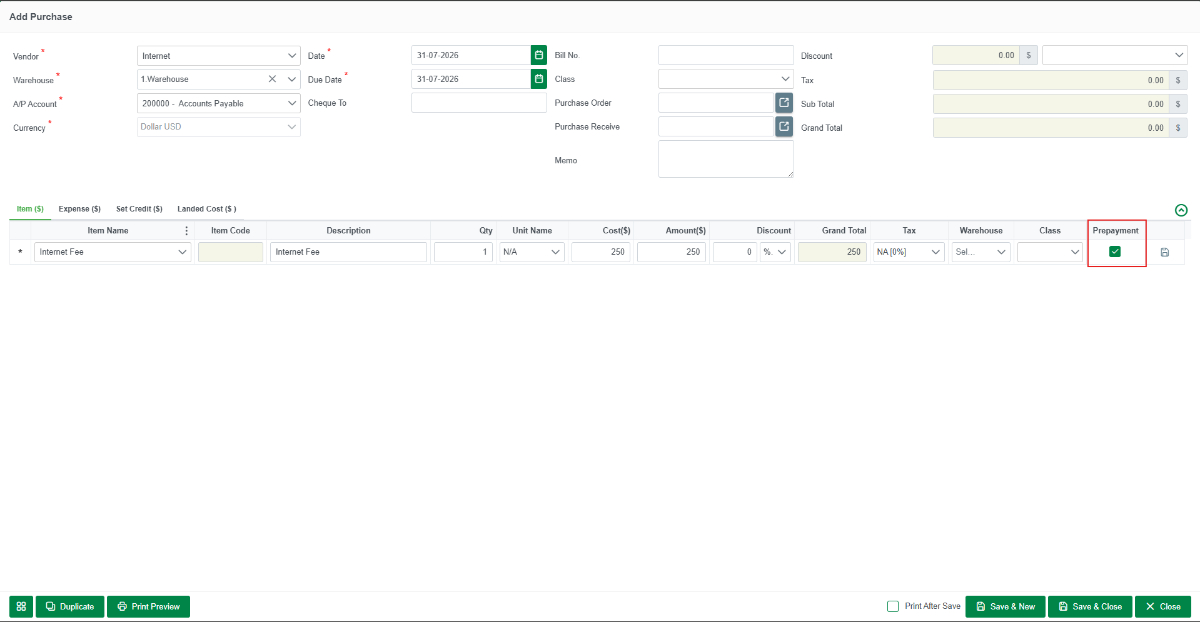
- Enter the purchase details, including the vendor, due date, and bill information.
- Add the Prepayment service item that you created earlier.
- Enable the Prepayment checkbox for the item line.
- Review the transaction and click Save & Close or Save & New.
Note: Enabling the Prepayment checkbox records the transaction as a prepaid expense. The amount is posted to the Prepayment (Other Current Assets) account and will remain as an asset until it is recognized as an expense
Allocate a Prepayment
After creating a prepayment purchase, you can allocate the prepaid amount across one or more accounting periods.
- Go to Vendor Center and select the vendor.
- Locate the prepayment purchase transaction.
- Click More Actions (▼) and select Prepayment.
- Enter the allocation details:
- Allocate From – The first month to start recognizing the expense.
- Allocate To – The last month of the allocation period.
- Number of Months – The total number of periods to allocate.
- Prepayment Account – The asset account used to record the prepayment.
- Expense Account – The expense account where the prepaid amount will be recognized.
- Review the allocation schedule generated by the system.
- Click Save to create the prepayment allocation.
Note: The system automatically allocates the prepaid amount evenly across the selected period. As each period is posted, the balance is transferred from the Prepayment account to the selected Expense account until the full amount has been recognized.


Create a Prepayment Journal
After creating the prepayment allocation, you can generate a prepayment journal to recognize the expense for the selected accounting period.
- Go to Accounting → Journal Entry.
- Click Add Special → Add Prepayment Journal.

- Review the journal entry generated by the system.
- Verify the Date, Branch, Memo, Debit, and Credit information.
- Click Save & Close or Save & New.
Note: The system automatically generates the journal entry based on the prepayment allocation schedule. The allocated amount is transferred from the Prepayment (Other Current Assets) account to the selected Expense account for the selected accounting period. You only need to review the journal before saving.

View the Prepayment Report
The Prepayment Report provides an overview of all outstanding prepayments, including their allocation period, recognized amount, and remaining balance.
- Go to Reports → Company & Finance → Prepayment.
- Select the reporting period.
- Review the prepayment details, including:
- Account
- Purchase Number
- Purchase Date
- Item Name
- Vendor
- Allocation Period (From – To)
- Number of Months
- Contract Value
- Open Balance
- Current Charge
- Balance C/F
- Print or export the report if needed.
Note: The Prepayment Report tracks the remaining balance of each prepayment throughout its allocation period. As prepayment journals are posted, the Current Charge increases and the Balance C/F decreases until the prepayment is fully recognized as an expense.

