Consignment is a business arrangement where products are transferred from one party to another for the purpose of selling, displaying, or distributing them, while the ownership and final settlement of the products are managed according to the agreed terms between both parties.
The party providing the products may send them to a store, mart, reseller, distributor, or other business partner. The receiving party can then sell or distribute the products, while the system helps both parties track the products that were sent, sold, returned, and invoiced.
The products can then be monitored until they are:
- Sold
- Returned
- Invoiced
- Settled according to the agreed arrangement
Typical Consignment Flow
Send Products → Sell Products → Track Sales → Return Products (if applicable) → Invoice / Settlement
This guide explains how to activate, set up, manage, sell, return, and settle consignment items.
1. Activate Consignment
Before using the Consignment module, you must first activate the Consignment feature in the system.
Activate Consignment:
- Go to Settings.
- Select Preference.
- Select Item.
- Scroll down to the Transaction section.
- Find Active Consignment.
- Enable Active Consignment.
- Click Save.
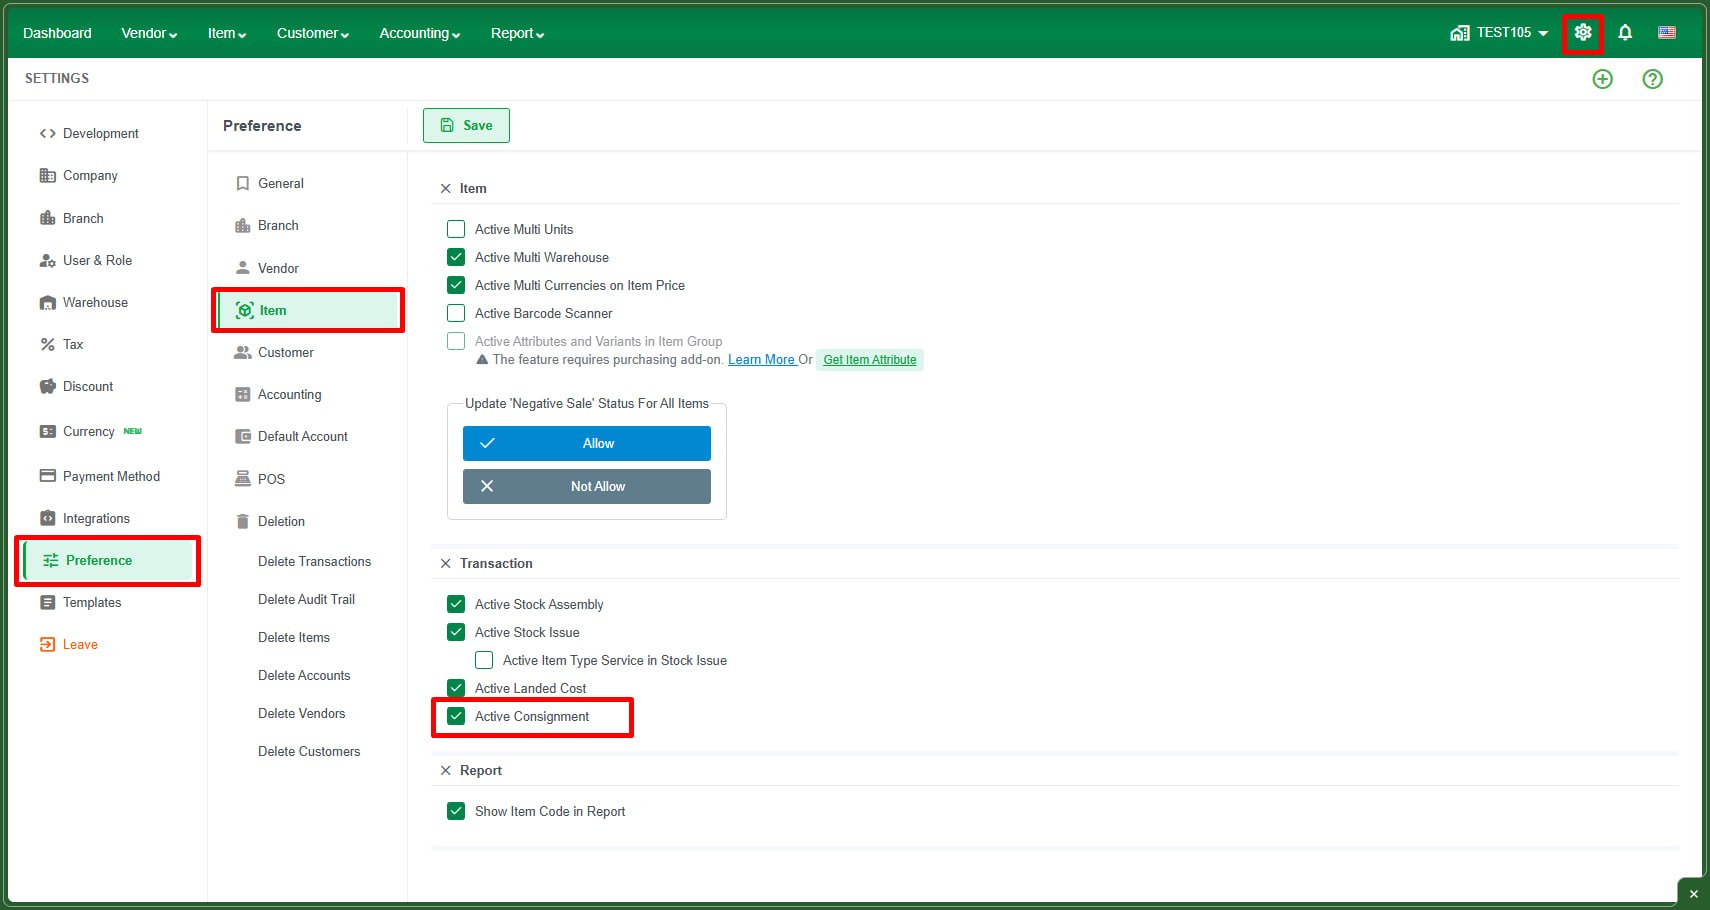
Navigation
Settings → Preference → Item → Transaction → Active Consignment
After saving the setting, the Consignment option will become available under the Item menu.
2. Open the Consignment Module
After activating the feature, go to the Item menu in the top navigation bar.
Steps:
- Click Item.
- Select Consignment from the dropdown menu.
- The Consignment screen will open.
Navigation
Item → Consignment
The Consignment screen is where you can create, monitor, and manage consignment products and transactions.
3. Consignment Screen
The Consignment screen provides two main views:
- Summary
- Details
It also provides tools for searching, filtering, sending, returning, and invoicing consignment transactions.
Available options include:
- Customer
- Search
- Refresh
- Hide Zero
- Send Consignment
- Return Consignment
- Add Invoice
- Edit
- More Options
4. Summary
The Summary tab provides an overview of consignment transactions.
Navigation
Item → Consignment → Summary
The Summary tab displays the following information:
| Column | Description |
| Date | The date of the consignment transaction |
| Customer | The customer associated with the transaction |
| Type | The type of consignment transaction |
| Number | The transaction number |
| Memo | Additional information or notes |
Using the Summary Tab
You can use the Summary tab to:
- Review previous consignment transactions.
- Find a specific transaction.
- Check the customer associated with a transaction.
- Identify the transaction type and number.
- Review notes recorded in the Memo field.
You can use the Customer filter and Search field to find specific transactions.
5. Details
The Details tab provides an item-level view of consignment products.
Navigation
Item → Consignment → Details
The Details tab displays:
| Column | Description |
| Customer | The customer who received the products |
| Item Code | The code of the consignment item |
| Item | The product that was sent |
| Sent | The quantity sent to the customer |
| Sold | The quantity sold |
| Returned | The quantity returned |
| Balance | The quantity still remaining |
The Details tab allows you to check the current consignment quantity for each customer and item.
6. Filter and Search Consignment
The Consignment screen provides several tools to help you find information quickly.
Customer
Use the Customer dropdown to filter consignment records by customer.
Select All to display records for all customers.
Search
Use the search field to find a specific consignment record or item.
Enter the search information and press Enter.
Refresh
Click the Refresh icon to reload the latest consignment information.
Hide Zero
Enable Hide Zero to hide items that have no remaining balance.
This allows you to focus on products that are still active under consignment.
7. Send Consignment
Use Send Consignment when products are sent to a customer (such as a store, mart, or reseller) to sell, display, or distribute on your behalf.
Steps
- Go to Item → Consignment.
- Click Send Consignment.
- Enter the basic information:
- Customer Name (required): Select the customer who receives the products.
- Address Name: Select the customer's address (optional).
- From Warehouse (required): Select the warehouse the products are sent from.
- Number: Auto from system (for example, CS-2026-09-0001).
- Date: Transaction date.
- Memo: Describe your consignment (optional).
- Enter the item information:
- Item Name: Select the item.
- Item Code: Auto from system.
- Unit Name: Select the unit.
- Qty: Enter the quantity to send.
- Qty Available: The available quantity shown by the system.
Note: Click the Save icon on the line to add the item and open a new line. Click the ⊗ icon to delete a line.
After filling in all information:
- Save & New: Save the consignment and add another one.
- Save & Close: Save the consignment and close the window.
- Print: Print the consignment.
- Close: Close the window without saving.
After saving, the transaction appears in the Summary tab with Type Sent, and the quantity is added to Sent in the Details tab.
8. Monitor Consignment Products
After products have been sent, use the Details tab to monitor their status.
The system shows:
- Sent — Quantity sent.
- Sold — Quantity sold.
- Returned — Quantity returned.
- Balance — Quantity remaining with the customer.
Example:
If Sent = 240 Cans, Sold = 120 Cans, and Returned = 48 Cans, the remaining Balance is 72 Cans.
View Item History
In the Details tab, click the list icon at the end of a row to see all transactions for that customer and item, including Date, Type, Number, Qty, and Balance.
9. Return Consignment
Use Return Consignment when products previously sent under consignment are returned by the customer, for example when products are unsold, damaged, expired or near expiry, no longer required, or returned at the end of the consignment period.
Steps
- Go to Item → Consignment.
- Click Return Consignment. (In the Details tab, this option is under the ⋮ More Options menu.)
- Enter the basic information:
- Customer Name (required): Select the customer who returns the products.
- Address Name: Select the customer's address (optional).
- To Warehouse (required): Select the warehouse that receives the returned products.
- Number: Auto from system.
- Date: Transaction date.
- Memo: Describe the return (optional).
- Enter the item information: Item Name, Item Code, Unit Name, and Qty (the return quantity).
- Click Save & New or Save & Close.
After saving, the transaction appears in the Summary tab with Type Returned, and the quantity is added to Returned in the Details tab.
10. Add Invoice
Use Add Invoice when the customer has sold consignment products and you need to bill them for the sold quantity.
Steps
- Go to Item → Consignment.
- Click Add Invoice. (In the Details tab, this option is under the ⋮ More Options menu.)
- Select the Customer (required).
- The Consignment Balance list shows the items this customer still holds on consignment: Item Code, Item, Balance, and Qty Sold.
- Tick the items that were sold and enter the Qty Sold for each item.
- Click one of the following:
- Add Invoice: Create an invoice for the sold items (the customer pays later).
- Add Sale Receipt: Create a sale receipt for the sold items (the customer pays immediately).
- Close: Close the window without creating a transaction.
- Review the customer, items, quantities, and prices, then save the invoice or sale receipt.
After saving, the sold quantity is added to Sold and the Balance decreases in the Details tab.
Note: Only items with a remaining balance appear in the Consignment Balance list.
11. Edit, Print, and Duplicate a Consignment Transaction
Edit
- In the Summary tab, select the consignment transaction.
- Click Edit.
- Update the required information.
- Click Save & Close.
If the Edit option is unavailable, select a transaction first. The transaction may also not be editable because of its current status or your user permissions.
Print and Duplicate
In the Summary tab, click the ˅ arrow at the end of a row, then choose:
- Print: Print the consignment transaction.
- Duplicate: Create a copy of the transaction.