A Stock Assembly records the production of a finished item from its components (materials). When you save a stock assembly, LocalizeBook deducts the components used from inventory and adds the finished item to the selected warehouse. The cost of the components used becomes the cost of the assembled item.
This guide explains what to set up first, how to create a stock assembly, and what each field on the Add Stock Assembly screen means.
Before You Start
Check these three things before you create a stock assembly:
- Stock Assembly is turned on in Settings (see section 1).
- The finished item uses the Stock Assemble item type and has its Item Recipes set up (see section 2).
- The components have enough stock in the warehouse you will use.
1. Turn On Stock Assembly
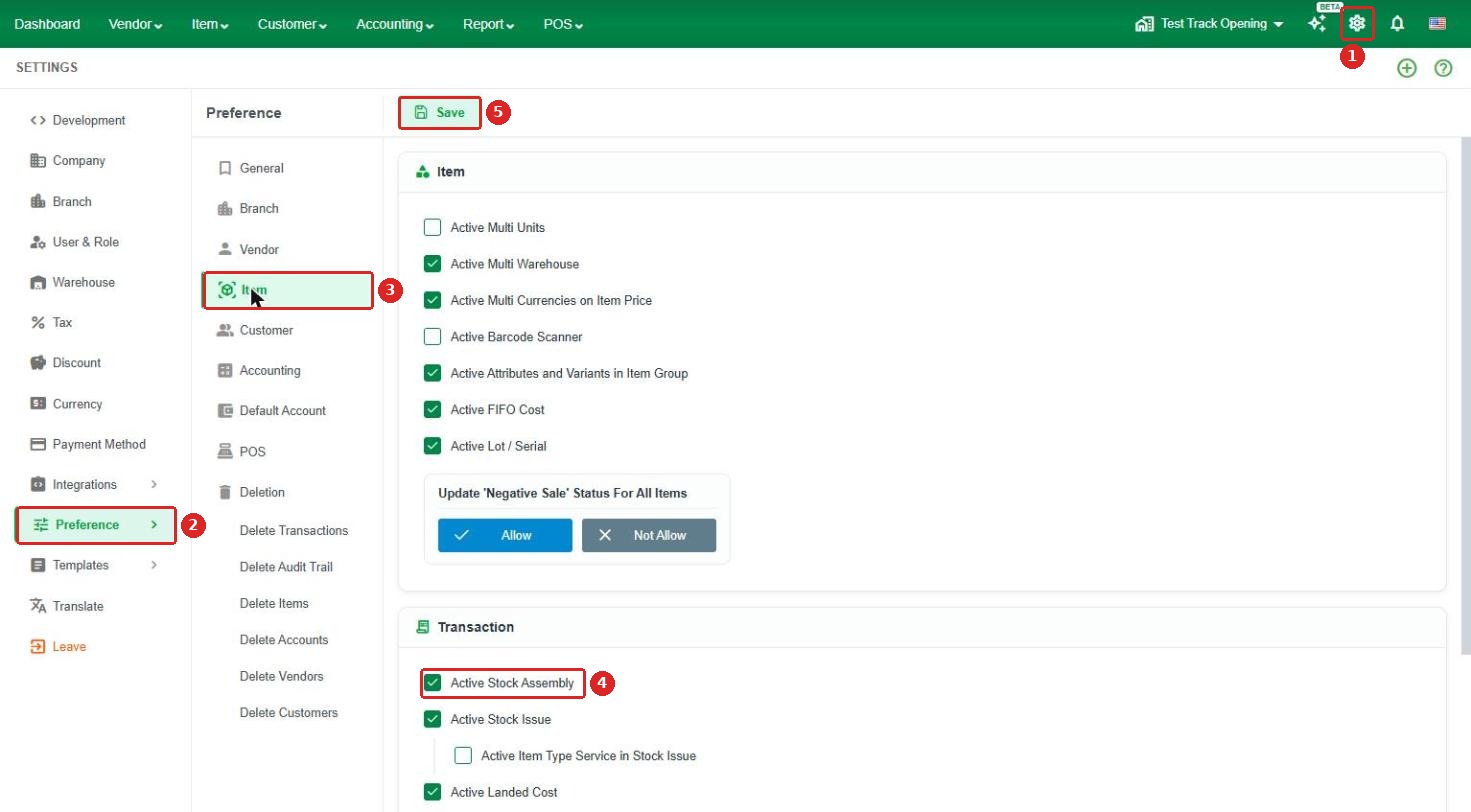
- Click the Settings icon in the top-right corner (No.1).
- Click Preference (No.2).
- Click Item (No.3).
- Under Transaction, check Active Stock Assembly (No.4).
- Click Save (No.5).
2. Set Up an Assembled Item (Item Recipes)
Only items with the Item Type Stock Assemble can be selected on a stock assembly. The Item Recipes tab lists the components, and the quantity of each, needed to build one unit of the finished item.
- Go to Item > Item and click +Add (or edit an existing item).
- Fill in the General Information, such as Name (English) and Item Group. The other fields work the same way as for a Stock Part (see the Stock Part article).
- In Item Type, select Stock Assemble (No.1). The Item Recipes tab appears.
- Click the Item Recipes tab (No.2).
- Add each component: select the Name (No.3), select the Unit (No.4), enter the Qty needed for one finished item (No.5), then click the Save line icon (No.6). A new blank line appears for the next component.
- Complete the other tabs, such as the unit set and accounts on General Info, then click Save & Close.
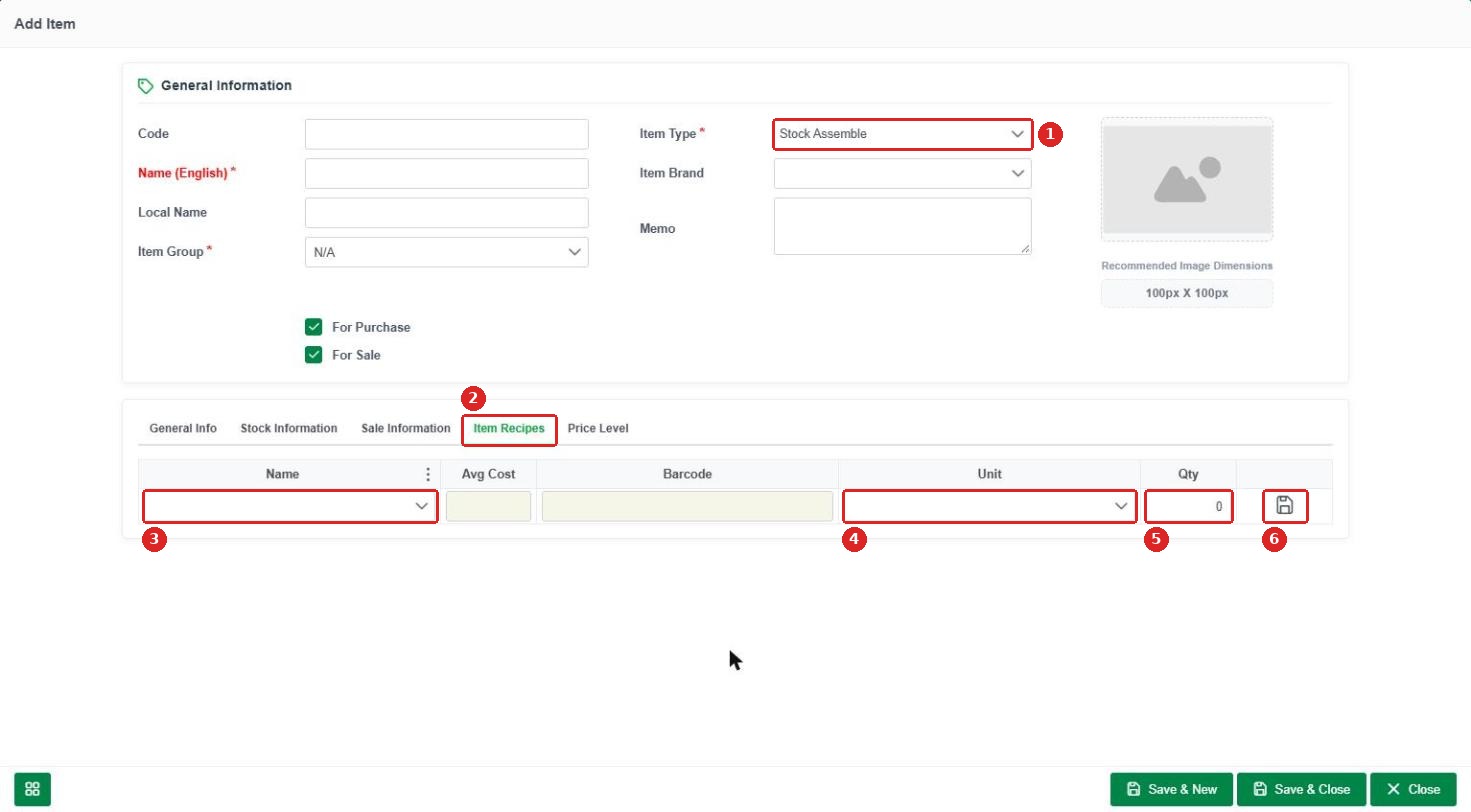
| Column | Description |
| Name | The component item used to build the finished item. |
| Avg Cost | The component's current average cost. Filled in automatically. |
| Barcode | The component's barcode. Filled in automatically. |
| Unit | The unit used for the component. |
| Qty | The quantity of the component needed to build one finished item. |
Tip: Enter recipe quantities for one finished item only. The system multiplies them by the quantity you produce.
3. Create a Stock Assembly
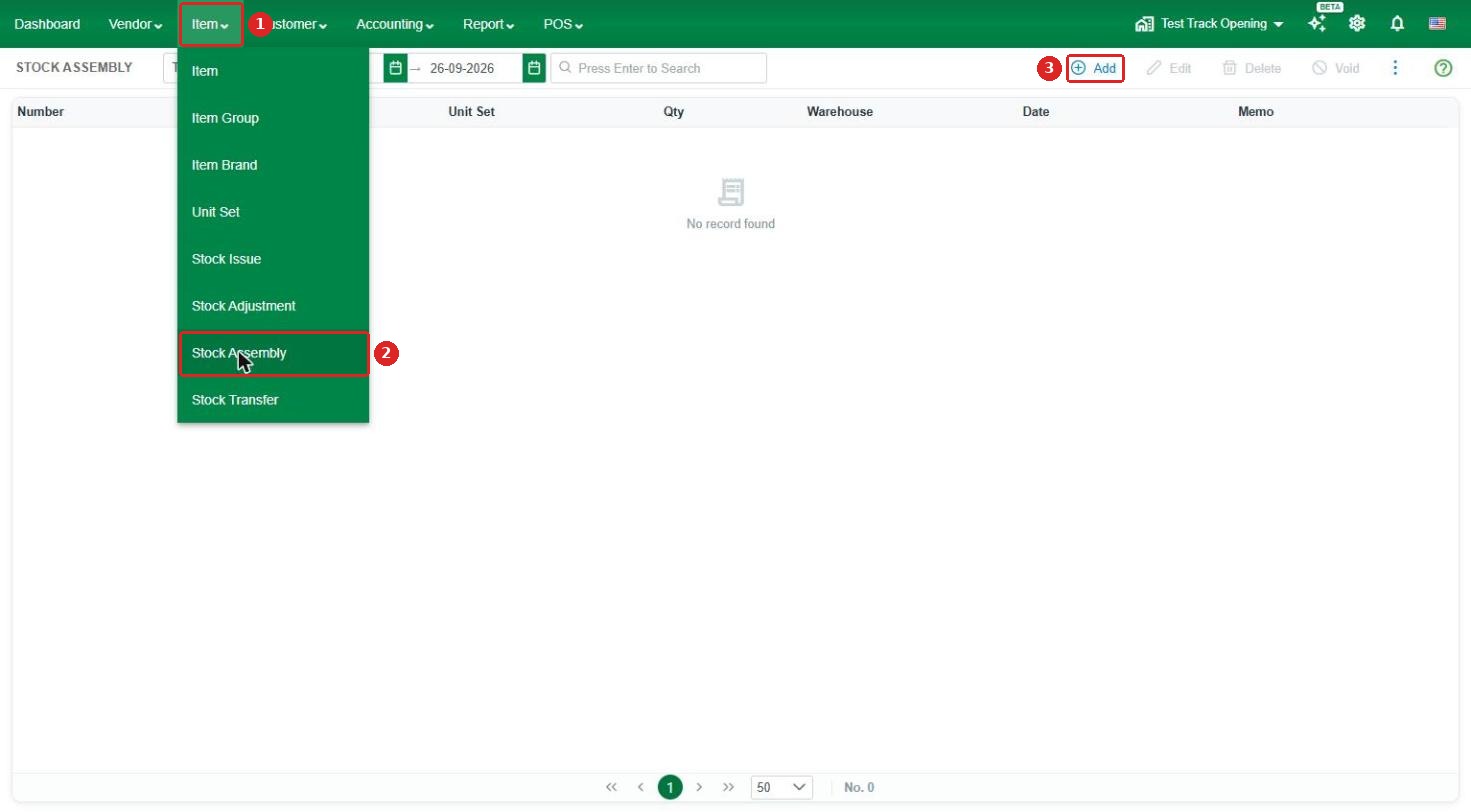
- Go to the Item menu (No.1).
- Click Stock Assembly (No.2).
- Click +Add in the top-right of the page (No.3).
On the Add Stock Assembly screen:
- Select the finished item in Item Name (No.1). Item Code, Unit Name, stock quantities and the Item Recipes lines fill in automatically.
- Check the Date (No.2). It defaults to today.
- Select the Warehouse (No.3). Components are taken from this warehouse, and the finished item is added to it.
- Enter the quantity to build in Produce (No.4).
- Review the Item Recipes table (No.5). Make sure Qty Available is enough for Qty Need on every line.
- Click Save & New or Save & Close (No.6).
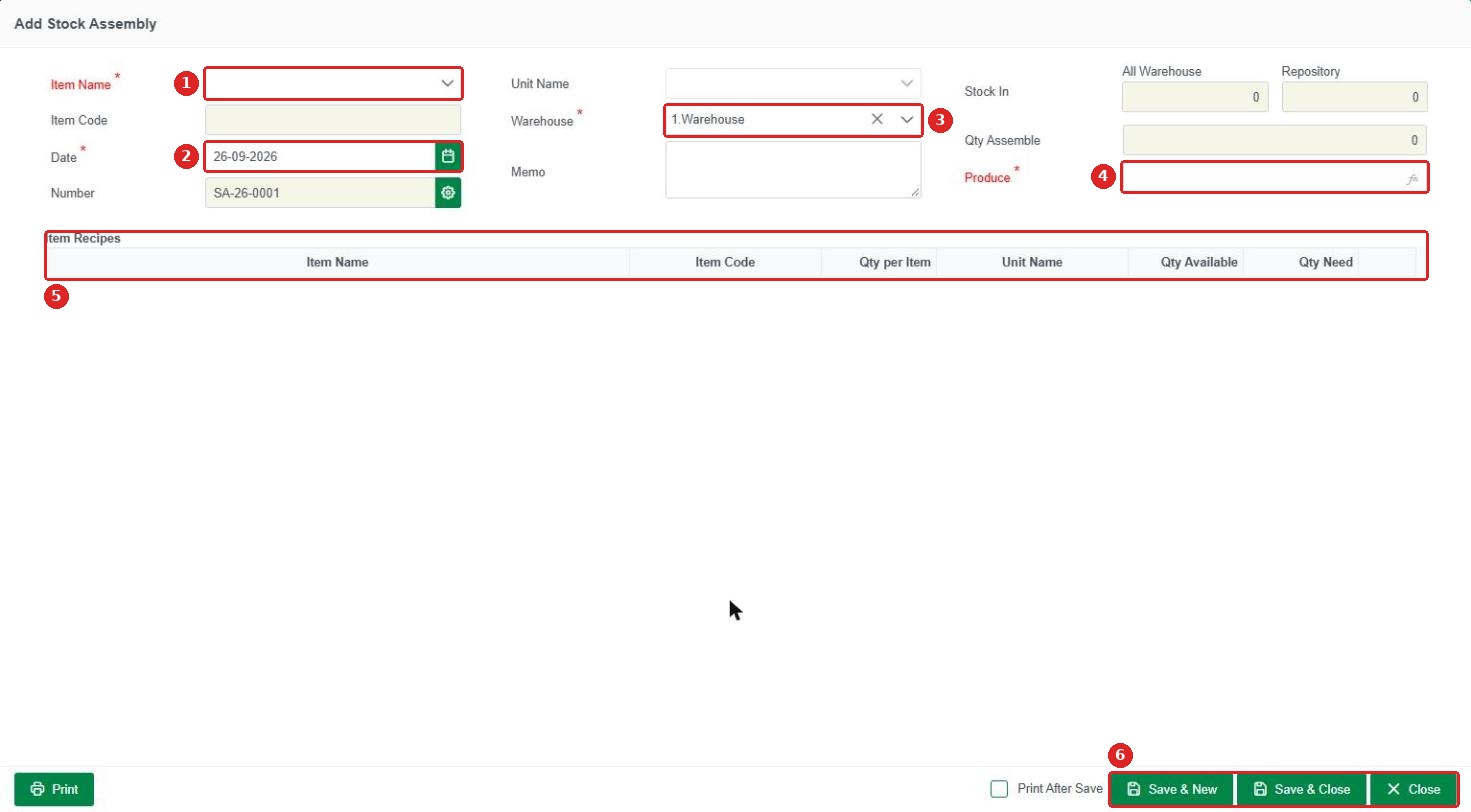
Important: Qty Assemble shows the most you can build with the components available in the selected warehouse. If it is lower than you need, add stock for the missing components first (for example, with a purchase or a Stock Transfer), or choose a different warehouse.
4. Field Descriptions
| Field | Description | Required |
| Item Name | The finished item to build. Only Stock Assemble items are listed. | Yes |
| Item Code | The code of the selected item. Filled in automatically. | No |
| Date | The date of the stock assembly. | Yes |
| Number | The stock assembly number, for example SA-26-0001. Generated automatically (see section 5). | No |
| Unit Name | The unit of the finished item. | No |
| Warehouse | The warehouse the components are taken from and the finished item is added to. | Yes |
| Memo | Notes about this stock assembly. | No |
| Stock In: All Warehouse | The finished item's current quantity in all warehouses. | Auto |
| Stock In: Repository | The finished item's current quantity in the selected warehouse. | Auto |
| Qty Assemble | The maximum quantity you can build with the components in the selected warehouse. | Auto |
| Produce | The number of finished items to build in this transaction. | Yes |
Item Recipes table
| Column | Description |
| Item Name | The component, taken from the item's recipe. |
| Item Code | The component's code. |
| Qty per Item | The quantity of the component needed for one finished item. |
| Unit Name | The component's unit. |
| Qty Available | The component's current stock in the selected warehouse. |
| Qty Need | The total quantity used: Qty per Item × Produce. |
Example
The recipe for 1 Computer is 1 CPU, 2 RAM and 1 SSD. You enter Produce = 5:
| Component | Qty per Item | Qty Need |
| CPU | 1 | 5 |
| RAM | 2 | 10 |
| SSD | 1 | 5 |
After you save, the warehouse has 5 more Computers, and 5 CPU, 10 RAM and 5 SSD are deducted from stock.
5. Number Format
Click the gear icon next to Number to open Format Stock Assembly No.
| Option | Description |
| Auto Generate | The system creates the number automatically. |
| Allow Edit Ref Num | Lets users change the number on the form. |
| Allow Duplicate | Allows the same number to be used more than once. |
| Auto Increment from Last Transaction | The next number continues from the last stock assembly. |
| Prefix | The text at the start of the number (default SA), followed by a separator and the year format (YY). |
| Sequence Size | The number of digits in the running number. For example, 4 gives 0001. |
| Reset By | When the running number starts again from 1, for example every Year. |
| Example | A preview of the number, for example SA-26-0001. |
Click Save to apply the format.
6. Save and Print Options
- Print: Print the stock assembly.
- Print After Save: When checked, the stock assembly is printed after you save it.
- Save & New: Save the stock assembly and open a new blank form.
- Save & Close: Save the stock assembly and return to the list.
- Close: Close the form without saving.
7. Manage Stock Assemblies
The Stock Assembly list shows each saved record with its Number, Item, Unit Set, Qty, Warehouse, Date and Memo.
- Date filter: Choose Today, This Week, Month to Date, Year to Date, Yesterday, Last Week, Last Month, Last Year or Custom, or pick the start and end dates.
- Search: Type a keyword and press Enter.
- Edit: Select a record, then click Edit to change it.
- Delete: Select a record, then click Delete to remove it.
- Void: Select a record, then click Void to cancel it while keeping it on the list for reference.
- More (⋮): Use Print All or Export All for the records in the list.
Note: Editing, deleting or voiding a stock assembly changes the stock of both the finished item and its components.